
Recently, Stoney Doughty from ATA Tactical shared this AAR with us from his attendance at the Magpul Dynamics Designated Marksman Rifle/Special Purpose Rifle course. We hope you find this useful.
This July I was able to attend the Magpul Dynamics Special Purpose Rifle/Designated Marksmen Rifle Class in Yakima, WA. I attended because I wanted to gain a better understanding of the semi-automatic rifle system when used as a designated marksman. I felt this would enable me to better instruct my Reserve Component Soldiers in achieving the maximum usability from their issue weapons. Additionally I felt this class would increase my weapons and shooting knowledge for my civilian job with ATA Tactical. The following are my thoughts and impressions from the course.
INSTRUCTORS
Caylen Wojcik is the primary instructor for this class. He was an active duty Marine with a rock solid career. He is also an avid hunter in his spare time. This really helps him relate to a large audience of students with his instruction. One of the things that concerned me prior to arriving at the class was that his military experience would overpower the course of instruction. I was pleased that this was never a issue. He did a great job of bringing his military experience in when it was applicable to the training or when asked. He spoke very clearly and at a pace that was not hard to follow. It was very easy to hear him regardless of what range we were on or what type of training we were doing. Over the course of instruction Caylen strove to make sure all questions were answered but still ensured we maintained our training schedule. This was crucial with the amount of information and tasks we had to cover over the weekend. I could easily see how we might have been cut short on other training or missed some topics completely if he hadn’t kept the schedule. Overall, I would have to rate Caylen as one of the best instructors that I have ever had through my military career or civilian career.
Tim Estell is the assistant instructor. He was also an active duty Marine who is now working on a civilian career. He assists Caylen part time and is also an avid hunter. His military career and experiences are not to the same of extent of Caylen’s. Don’t let that prevent you from taking his advice. He will get you shooting on target in a heartbeat if you listen to him. He primarily acted as demonstrator for Caylen and worked with students individually once we hit the firing line. He did give some instruction during a few of the classes. He spoke just as well as Caylen and I had no problems understanding any of the material he presented us with. He is an excellent instructor with a broad future ahead of himself.
I know what you may be thinking since both of them had been prior active duty Marines. The good news is that for being Marines they actually knew how to talk to people. All jokes aside both of the instructors were great. They were very personable and able to teach the course material in a manner that each student can understand. If you were prior military, they will talk the talk. If you are a new shooting girlfriend then they will relate the material to you as well. I guarantee it. These guys are so relatable that I am really motivated to encourage my wife in attending the course. That is huge because my wife can be very particular about what and who she is willing to tolerate. If you can’t relate to her then kick off. I am hands down positive these guys would make the class fun for her regardless of environmental conditions and without any additional effort. Outstanding guys hands down.
INITIAL LOCATION IMPRESSION
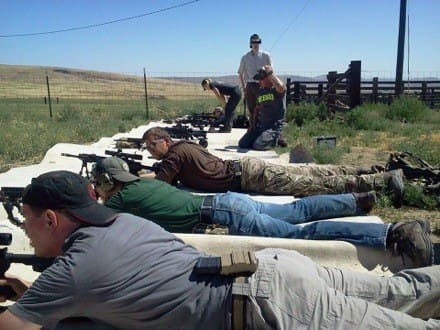
When you first arrive at the range it is not quite what you expect. It is a farm house with a large barn in the bottom of a grassy draw. The location is right out in the open and completely surrounded by grass farmlands. I initially thought that this was going to be a meeting location and that we would continue on to the range. I was wrong. All of the ranges are central based right at the main house. For the training you could easily walk to each of the three ranges used for this course. Be warned that if you are scared of getting some dirt on you or weeds in your clothes then you will want to bring a shooting mat. Caylen and Tim were kind enough to roll out some big felt mats on the 100 yard range. You will spend most of your time at the 100 yard range so it was a generous gesture.
Be warned that there is no overhead cover offering protection from the elements at any of the three ranges. If you attend a summertime class like I did then start thinking about the sun. That sucker gets hot! A hot like I have only felt during military training or deployments. When the wind picked up you felt mixed emotions. On one hand the wind cooled you down, on the other it would mess with your shot. Some other students brought one of those sun shade tents. It worked ok but the wind was about to collapse it whenever the speed picked up. Additionally, since the sun naturally changes position, the shade would only be for part of the day. Your best friend for the UV rays is sun block lotion or spray. I applied it thoroughly every morning and still got a wicked tan line on my face. Also, Caylen and Tim will hoot and holler at you to drink water. Listen to them. Don’t bring a 16 oz bottle and think you’ll be alright. Caylen used a one gallon jug. By the end of the class there were a lot of one gallon jugs around. Temperatures on the range were about 105 degrees during the day. It was even hotter when you were laying in the prone on the ground. Caylen and Tim will warn you and it would behoove you to believe them.
RANGES
The 100 yard range is off to one side and is a pretty decent setup. The target stands are well placed. There was no vegetation or obstacles inhibiting view of the targets at 100 yards. You’re going to spend a lot of time at this range working on your fundamentals and doing various drills. You are set in pretty close to other shooters so don’t be surprised if you get a nice hot brass burn on your body at some point. That being said don’t be a whiner if you’re getting hit with a searing hot piece of brass. Our class was pretty good in understanding the situation. A lot of folks placed packs next to their rifle to prevent brass from ejecting onto the next shooter. It worked effectively and was a very simple solution. Overall the setup of the 100 yard range is a pretty good. It allows you to get the training you need and in the most effective manner possible.
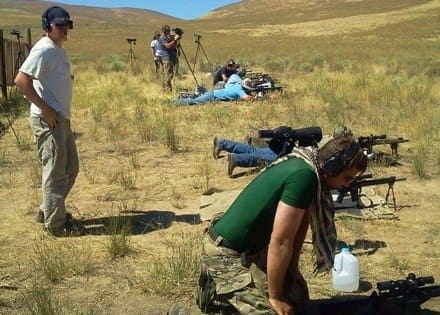
The 600 yard range is actually just behind the 100 yard range. You actually setup just behind the 100 yard targets. Your will be shooting across a small draw into the base of a decent ridge. The firing line is nice because you can spread out plenty wide. There is quite a bit of grass and sagebrush. When you setup your prone position make sure you are getting a clear lane of fire to view and shoot through. Some of you might consider this a pain considering your paying money for the class. I have this to say, “Don’t be a range Madonna”. This class isn’t about how to shoot from the bench. So take the extra 10 seconds to select a good firing lane. I personally felt it increased the training experience. It helped me feel like I was getting settled in so I could place one hell of a spook shot on a big mule deer buck or some Red Dawn invader. For the alternate shooting positions this firing range works just fine. But, as I stated earlier, there is no shade. None, zero, zip. You’ll be fine. Apply sun block and drink water then you’ll have a good old time.
The 800 yard range is down the hill from the house. You have to pass through a corral area and then on into open field. The firing line is placed between two large metal tee-pee setups. Our class had to contend with some tall weeds in order to effectively setup a firing position and gain visibility on the targets. Caylen and Tim did let us know that the growth was recent and does get mowed down if they have the opportunity to do so. They also mentioned conditions at the range can vary heavily depending on the time of year and farm cycle. If you attend a course later in the summer you might wind up in a dust bowl. So be forewarned. Overall the targets are fairly easy to spot. You have to use your eyes and don’t be afraid to dial back on your scope power to gain a wider magnified field of view. A spotting scope was very useful on this range. Again, no cover or shade. We were on this range during the late afternoon which is the hottest part of the day there.
Non-Shooting Classes
There were two locations where we held non-shooting classes. One was right at the 100 yard range. As you know there is no shade there. Those classes can be hot if they are later in the day. Drink water! A white board is used so you will be wanting to get that notepad and pencil out for any diagrams or important points that come up on the white board.
The other location is nice! It’s up on the farm house yard in the shade of a big tree. Primarily this is where you will have lunch. We did have a few classes at in this spot which were pretty nice during the heavy heat of the day. When you get the chance to enjoy it then take it all in. But make sure your brain is ready to leave that spot to do more training. Depending on the time of year you may encounter some bugs and crawlers. Nothing crazy though.
For these classes take the opportunity to prepare for your upcoming shooting block. Drink water and eat some calories. I ate Nutri-grain bars. These did pretty good but I would highly recommend something a bit more substantial. If I do a class like this again, especially in the heat, I will bring Power Bars or something with better calorie and energy replenishment. Another item to bring is a range chair. The list it on the Magpul website recommends it. While I survived well enough without a chair it sure would have made that down time a whole lot easier.
KEY TRAINING POINTS
Fundamentals
You can put lead downrange right off the bat if you want. But that would be pretty wasteful. Thankfully the very first class you receive from Caylen and Tim is a sit down take notes kinda class. It’s on fundamentals. To assist with this class you are given a great training aide. It’s a little laminated card set with range conversions, ballistic information sheets, spotter guide, and the fundamentals. Keep that in your pocket because it is handy! I have been shooting since I was 2 years old so I felt I had a good grasp on the fundamentals. Let me tell you now, I learned a few things. Some of the information may be counter or different to what you know or practice. Well you didn’t pay money to show up and argue with Caylen and Tim so take notes and try their techniques out. You may just be surprised.
When you actually begin shooting take the time to apply the fundamentals you just learned. It was hard for me to change my habits such as trigger finger placement and using natural point of aim. I recommend that you get out those cards they distributed and set them up beside your shooting position. Then take the time to make sure you are actually performing the actions on the card. Don’t just blow through it because you will be wasting your ammo. Caylen and Tim will re-enforce to you that the fundamentals apply to all shooting positions. From what I experienced I would have to agree with them. I was surprised that exhaling completely as I was instructed influenced my shooting from a braced standing position. Overall this class was one of the most important classes to me even with having a lifetime of shooting experience.
Natural Point of Aim (NPA)
Another huge class point to gain from Caylen and Tim. It was also one of their choices as the most important tool to gain from their instruction. This was absolutely the hardest skill for me to place into practice. I think a lot of the students struggled with this concept. It didn’t matter if they were new shooters or experience shooters. But after taking the class I am fully aware of why it was enforced so much. To simplify the idea of NPA here is how I would explain it. It is setting up into your rifle so that the firearm points automatically at the target. By doing this you expend less energy and time finding the target, engaging the target, and re-acquiring the target. Your NPA will directly affect your follow through which in-turn decreases the amount of time needed re-acquire your target. The chain of effect is in full swing with NPA. So when you hear instruction to ensure your NPA, do it. You’ll get faster at this skill with more practice. Remember that you are learning how to do perform NPA at this class. You can practice it when you get home. This skill is actually a part of your fundamentals. And like the other steps in your fundamentals you will use it from all shooting positions. And I will personally swear to you that it will greatly benefit your shooting accuracy, especially as the distance to target grows.
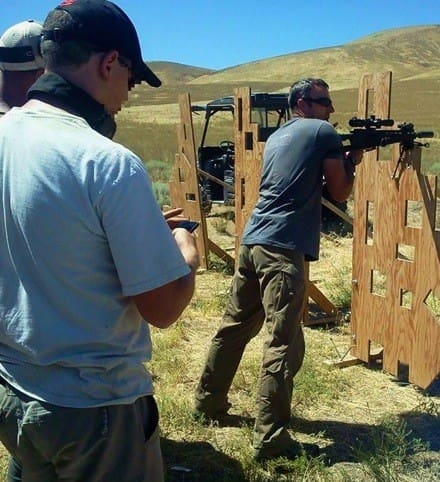
Alternate Shooting Positions
You will learn to shoot from many more positions than just the prone. To be honest, a mind blowing amount of alternate positions. To demonstrate the number of varying positions Caylen and Tim will show you a few common positions with some variations. Then your brain bucket will explode when Caylen starts whipping his rifle sling around. You thought you knew how to brace up on a target, well not anymore. Once you see a few different sling ideas for bracing then the countless possibilities for setting up a stable shooting position start running through your head. I’m talking an excruciatingly endless combination of possibilities. On the Magpul website they recommend the MS3 sling. It’s a good recommendation, not just a product plug. I would expand upon this by recommending you have quick disconnect (QD) points on both sides of your butt-stock and both sides of your rail. You might even want to have some forward points as well as rear points for your rail. It will only increase the usability of your sling. Another sling that received good marks at the class was the Blue Force Gear Vickers Tactical sling.
Optics
There was, in my opinion, a decent variety of optics represented at the class. Vortex definitely made a strong showing. There were fixed four powers all the way up to a 2.5-15 power. Reticules were vastly wide ranging without a doubt. I was using a ballistic reticule that was graciously loaned to me by Greg Hamilton from Proof Research. Caylen and Tim were knowledgeable on all the optic reticules presented to them and were able to give each student instruction on how to optimize their reticules. Needless to say there wasn’t a whole lot I could do with a ballistic reticule. They do offer some options and practices that can increase the usability of ballistic setups. I personally won’t be using one in the future. Additionally, Caylen and Tim did a great job instructing us in the use of our turrets. It was great being able to come away from the class fully confident in using my turret adjustments. It doesn’t matter if it’s a minute of angle or mil turret. If you know how to spin that dial based off your dope sheet, then your rifle will be set to smoke targets. I have never used a turret more then to zero prior to this class. Being as I had a ballistic reticule making optic adjustments using the dials became my go to technique. I couldn’t use a reticule hold like the other guys. When the time came to switch distance I gave those turrets a twist. It was actually pretty quick to do. I would definitely feel comfortable whipping them around while hunting provided the animal was calm enough to give me a second or two of time. Not much more would be needed. And let me tell you I used those suckers like a rental car. I was adjusting up and down like crazy in-between targets. A new distance equaled new turret setting. My dope was rock solid all weekend so by the last day I was more than confident in my adjustments. It was AWESOME!
GEAR
I know I have already covered a couple pieces of gear such as slings and chairs but I want to re-iterate on those items and cover some new items. Overall the list provided by Magpul was pretty thorough. Some of the gear was essential to bring for the class and others not so much.
Laser Range Finder
Brought it. Didn’t use it once. Caylen and Tim used theirs for our range estimation class. It would have been cheating for me to use mine in that class. Don’t get me wrong it could be handy for the class but I really didn’t see where we needed one at any point during the three days. If you want to bring it and have it in your car I think you would be alright. Just don’t make plans for hooking it to your kit.
Range Chair
Yup. Should have brought it. Magpul recommends it and I didn’t listen. It could have been has simple as a Wal-mart camping chair or something more high speed. In the future I’m going with the Kifaru chair. It will be a versatile system I can use further on for other applications. But let’s get back on track. A chair is great for this class for several reasons. You can use the chair for the administrative classes right off. Another great use for it would be for spotting your shooting buddy. It’s okay to be standing while you’re spotting but it would be much steadier to be able to sit down while you’re calling shots. And lastly a chair would be good to collapse into when needed. You are going be exhausted at the end of the day. If you aren’t then you probably cheated yourself during the course of instruction. I can tell you that I was sore but it wasn’t from the rounds fired that day. It was from constantly setting up into the rifle and bracing into firing positions. To clarify, Caylen places strong emphasis that you must be fully relaxed in order to get a good NPA. I wasn’t muscle sore from being set in the prone. I was sore at my points of contact such as the elbows, knees, and oddly enough my lower rib cage. When you’re laying in the prone all day it gets a bit sore.
Knee and Elbow Pads
I had the distinct advantage of running combat pants and a combat shirt. There are elbow pads built into the combat shirt. They aren’t very thick and are a soft padding. If you fell on your elbow it would still frickin’ hurt. For lying in the prone the padding worked great. Many other students had some bandages on their elbows by the last day and I don’t blame them. Between the heat radiating off shooting surfaces like the ground and rubbing your skin in the dirt, your elbow is going to get raw. I would not recommend a hard plastic elbow pad. From my past experiences I would say they are too unstable and would be a hindrance.
My combat pants allowed for a light foam insert. Again, this pad isn’t going to do help too much from a sharp blow. Much like the combat shirt it worked great in keeping the heat off and the little sharps from digging into you. When you are getting up and down from the prone position constantly this is a big benefit. This is especially apparent when you go to the 600 and 800 yard ranges and there isn’t any felt to set up on.
If you have the equipment or have the time to modify your clothing consider some nice light padding for your kit. I would recommend picking up some surplus Army Combat Uniforms. You might be able to find them in the goofy UCP or MultiCam. Either way they both accept the foam pad inserts in the knees and elbows. Some companies offer pretty affordable alternatives that are well designed for shirts, tops, and pants if you’re interested.
Sharpie Markers
You’re chuckling right now but guess how many folks were trying to use a ball point pen that was dried up to mark their targets. And a ball point pen doesn’t do jack when trying to write your dope down on a laminated smart card. Bring a fine point Sharpie if you choose to only have one marker. I actually carry a high temp, fine point, black sharpie and a regular tip silver sharpie. I carry the silver because it will stand out on a black target backing. In addition you can use it to mark your equipment at the class in case you need reference points.
Bandana/Handkerchief
Another item I just happen to have that received a lot of use. With our class being in the July sun all of our equipment just sucked in the radiant heat throughout the day. I used the bandana to layover my equipment while I was checking targets or going through an administrative class. I also used the bandana as a sun shade to better see my ballistic computer (read as phone). The bandana also served excellently for cleaning my eye pro, collecting brass, wiping sweat out of eyes, and estimating wind. Really I could keep going on about the bandana. Some of you might consider a shemamig if you have to be taticool, but still handy kit. I can see it being just as useful for cooler weather classes.
Spotting Scope
If you have a spotting scope with reticules in it I would recommend bringing it. I noticed that when spotting I could effectively call shots with my rifle but it was more difficult. That is because I was having to setup on my rifle like I was going to fire in order to remain steady enough for accurate shot calls. In my experience at the class I noticed that the spotting scope offered you a wider field of view at a more comfortable magnification. Having the spotting scope mounted to a tripod was another great benefit. It provided an easy to use and adaptable platform. This again made use of the spotting scope more comfortable. I keep placing emphasis on being comfortable while spotting. You may be there for a bit if you’re shooter is having some difficulties. It benefits your shooter if you can stay calm even if they are getting frustrated.
EQUIPMENT TIP
Rifle
You may have noticed on the Magpul website that there isn’t a whole lot of restriction or guidelines on what firearm you can bring. That is because Caylen and Tim want you to run the equipment that suites your needs and requirements. I feel that this is a realistic allowance by them. But here is the catch and it falls on you the student. TEST YOUR GEAR BEFORE YOU SHOW. Don’t just slap some new parts on rifle prior to the class and expect it to be golden. You might get lucky. Emphasis on the word might. In reality you will have equipment problems when putting gear together. So take my advice and make sure you can fire at least 60 rounds on two separate range visits to shake down your gear. Set your 100 yard zero, mess with your turrets to make sure they are tracking, check your grouping size, etc. Basically know your weapon prior to showing. I’m not going to lie; I showed up and used a loaner upper. My only advantage was that it was a proven system that hadn’t been changed prior to my use. When I attend my next precision rifle class, and I will, I will run my firearm thoroughly prior to the class. I would much rather fight gremlins at home then to miss instruction because my weapon was jacked.
Ammo
Let’s start out right now by stating that I’m a re-loader. I didn’t run re-loaded ammo for this class simply because I couldn’t get enough materials in time. I’m glad I didn’t too. If you run your own ammo absolutely ensure that you have quality reloads. Make sure you’re getting consistent muzzle velocities, consistent bullet weights, and consistent assembly specifications. Basically, make sure you are capable of producing match grade ammunition. Will lesser quality ammo work? Yes. Is it worth your time? Not if you really want listen to the sweet, sweet sound of copper pinging into steel. I’m going to spend some time really beefing up my re-loading skills so that I can create production quality ammo or better. Now for those of who are just going to be purchasing ammo. Don’t be a skimpy, penny pinching, cheap son of a… Buy good ammo! If you don’t you’re going to be as bad off as the guy who is reloading. Really you might even be worse off. At least the guy who loaded his own ammo knows what’s going on with his rounds. You, on the other hand, are hoping that Bob at the assembly line hadn’t been drinking that day so hopefully the machine dropping powder was calibrated correctly. Bring good ammo and you will be a lot closer to having an excellent time at these precision rifle classes.
SUMMARY
If you own a semi-automatic rifle that is equipped with an optic I feel that you absolutely, positively must attend this class. Regardless of the heat and conditions, the information and skills that were taught to us by Caylen and Tim are absolutely phenomenal. The skills learned in this class can transform the un-educated civilian with a cool rifle he bought during the scare into an educated and effective civilian rifleman. You as the civilian will be able to shoot better, hunt better, and defend yourself and family better. It is an all encompassing class because it teaches you fundamental knowledge of marksmanship. This class is basically the Appleseed program with optics. You’re paying a lot more for this class as opposed the Appleseed program I know. But you are increasing your capabilities by an equally exponential amount. This program should absolutely be the flagship of the Magpul Dynamic curriculum due to the vast application it gives to the student. So if you are considering taking this class I say send in the application right now. I feel it is absolutely worth the cost involved. Your instructors will be phenomenal, the training handouts you will receive will actually be usable, the skills learned can be applied to your everyday shooting life, and you will freakin’ have fun. With that I leave you. I have a range card to build in my elk hunting hole.
Matt “Stoney” Doughty
ATA Tactical
Tags: ATA Tactical, Magpul Dynamics
I whole-heartedly agree with your assessment. Caylen and Tim are a great instructing team and the courses are a must-do if you are at all interested in long range precision shooting (I attended the Precision Rifle 1 class in the heat of summer).
Thanks for sharing. Looking into the class now!