
Redback One has posted the zeroing standards from their Carbine Operator’s manual. Redback One is a wealth of knowledge so keep up with their latest posts on www.RedbackOne.com.
M4 Iron Sights
To adjust elevation using the factory M4 iron sights, rotate the front sight using a sight adjustment tool, multi tool or the tip of a bullet. To bring the point of impact up, follow the arrow markings on the front sight base. Up will be clock-wise and down counter clock-wise. Each indent or click on the front sight will move the Point Of Impact or (POI) by 1-inch at 100-meters.
To adjust windage using the factory rear A2 sight, follow the arrow markings on the right side of the windage knob. To move the POI to the right, turn the knob clockwise. To move the POI to the left rotate the knob counter clock-wise. Each click of the windage knob will move the POI ½ an inch at 100-meters.
Moving the Group
Following the manufacturers guide will give the shooter the best results when making adjustments to the sight during the zeroing process. The shooter must determine the center of the group or, the Mean Point of Impact or (MPI) before making any adjustments to the sight. The pattern formed after firing is known as the group. The center of the group is known as the Mean Point of Impact. If after firing the first three round group it is determined that the MPI is a long way from the desired zero point, the shooter should make bold adjustments, using the manufacturers guide to move the group in the general direction of the zero point. Once the shooter is in the vicinity of the zero point, he can then use fewer click adjustments to make fine movements of the group until the correct zero is achieved. Remember, the value of the click will be reduced by ¾ when zeroing from 25-meters. Therefore, if the value of each click is 1-inch of movement at 100-meters, the value of the same click will be ¾ less or ¼ of an inch at 25-meters.
Zeroing Practical
The Zero Process: 50m-200m Zero
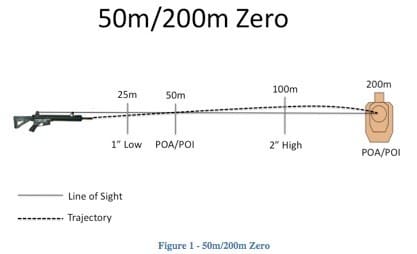
To achieve a 50/200-meter zero, the MPI of the shot group will be 1” low of the aiming mark at 25-meter. When using the Redback One Zero target the shooter will use the solid 1” square of the lower left or right zeroing target as the Point Of Aim or (POA) reference at 25-meters. The POI should be center of the hollow 1” square directly below.
Extreme Spread
The group is measured from the center of the furthest apart shots in the group. The distance between these shots is known as the extreme spread or (ES). The ES at 25-meters should no more than 1.5-inches. This represents the minimum marksmanship requirements at 25-meters.
When zeroing at a reduced distance, it is important to confirm zero at each zero distance. The first distance will be at 50-meters. When using the Redback One Zero target, shooters will use the lower bullseye target to confirm at 50-meters. Groups should be POA/POI at this distance. Minor adjustments may be required for some shooters. The ES at this distance should be no more than 3-inches.
After the group has been assessed, the shooter should then move to the 100-meter line and fire (3) deliberate (10) round groups for marksmanship purposes, breaking and resetting the firing position between each group. This will establish a Central Zero Point (CZP), or true zero of the weapon. The CZP should be no more than 2” above the POA at 100m. The ES at this distance should be no greater than 6-inches. This represents the minimum marksmanship standards at this range.
By performing this process shooters will become more confident in the performance of the zero between 0-100m and understand the trajectory of the bullet during flight.
The following picture highlights the trajectory of the bullet and where it intersects the line of sight at 50m and 200m. This picture is not to scale and should be used as a guide only.
Confirmation of Zero
The shooter must move to the 200-meter line and confirm the zero is correct and can accurately engage targets at that range. An automated range with monitor to reference shot placement is preferred. However, is this is not available; using a butts-party to identify impacts can be used. As an alternate method, several steel reactive targets can be placed at the berm. The shooter can engage the steel targets to receive instant feedback of hits. This method is relatively crude, as it will not allow the shooter to determine exact accuracy.
Download the PDF here.
Tags: Redback One