XC3 Weaponlight

Archive for the ‘Maritime’ Category

Leading Canadian Submersible Robotics Company Launching New Semi-Autonomous ROV System, REVOLUTION NAV

Wednesday, September 16th, 2020


The REVOLUTION NAV package makes locating, tracking and operating an ROV easier than ever before.

August 18, 2020 – Kitchener, Ontario – Taking a big step towards developing a hybrid autonomous vehicle, submersible robotics company Deep Trekker is proud to announce that they are launching a new ROV package, the REVOLUTION NAV. Offering advanced navigation and stabilization, this new package is leading the way in semi-autonomous vehicles. The REVOLUTION NAV package provides pilots with a Google map showing their ROV’s position on screen, allowing users to see where they are, leave a trail to show where they have been and set points of interest to where they want to return to. Furthermore, advanced stabilization features allow operators to station hold against currents, enable auto altitude and pilot their vehicle precisely and accurately through varying water conditions.

Solving harsh environmental situations with fully assembled, tested and ready to use remotely operated vehicles (ROVs), Deep Trekker gets eyes underwater in minutes. With applications in aquaculture, energy, shipping, defense, infrastructure and search and rescue among others, Deep Trekker’s underwater drones are on the leading edge of submersible technology.

“We are thrilled to be launching the REVOLUTION NAV,” shared Deep Trekker President Sam Macdonald. “With this new package, users will be able to know where they are in real time. This advanced navigational tool allows for more complex missions to be successfully carried out by ROV pilots.”

The REVOLUTION NAV’s capabilities are especially useful for applications in open, murky water or when there is significant current. The state-of-the-art features provide benefits across numerous applications for missions requiring precise navigation, location tracking and reporting. Search and recovery teams, for example, will be able to easily see and track what areas have been covered as part of the search. 

“The REVOLUTION NAV uses our BRIDGE technology and sensor fusion to provide station keeping, location tracking and intelligent navigation in addition to real time location data,” explained Macdonald. “We aim for constant innovation and the REVOLUTION NAV allows us to continue to provide advancements to our customers and pave the way towards autonomy.”

The pairing of USBL and DVL with Deep Trekker’s BRIDGE technology and sensor fusion bring this intelligent navigation system to life. USBL systems utilize sonar beacons to triangulate the position of the ROV. A GPS chip inside the Deep Trekker BRIDGE Controller allows the system to correlate the data and provide real time latitude and longitude. DVL offers users an enhanced navigational system by providing pilots with the ability to accurately and conveniently determine velocity relative to the seafloor, allowing for easy navigation through the most complex of operations. 

www.deeptrekker.com

SCUBAPRO Sunday – Weights

Sunday, September 13th, 2020

An essential part of preparing for each dive is calculating the amount of weight you’ll need to ascend and descend safely and effectively. By gearing up in the correct amount of weight, you can successfully maintain neutral buoyancy throughout the dive.

Many factors can affect your buoyancy—your body composition, the equipment and clothing worn, the amount of air you’re breathing, and the water you’ll be swimming in (freshwater/saltwater). Being able to add weights to your dive belt or in the pockets of your BCD can help you minimize drag and make your finning more efficient.

Proper weighting and buoyancy control are crucial if you want to have a successive dive. Unfortunately,there is no extract formula to help say how much weight you should wear on any giving dive. The reason for this is no one is exactly alike. So, all you can really rely on is knowledge and practice, I will say this a couple times a good log will help more then you will know. This goes for anything you do. Always keep a logbook, for land warfare, over the beach, and as much as you can. This will help when it has been a couple of months in between doing things. To help make it easier, below are a few easy steps you can take, preferably with the assistance of a dive weight calculator. Find a formula that works for you and stick to that, but make sure you test yourself before each dive. Also keep a dive log of all your dives. (See told you I would say this a lot) Write down what you wore, what way was the current going to you have to kick harder, were you carrying anything extra like a ladder or breaching tools, and how you felt. Make sure you have water temp, wetsuit thickness, and other information like that. This will go a long way to helping with future dives.

Weigh Yourself and your Gear

A rough approximation of the weight you’ll need can be figured out quickly by weighing yourself and then using those numbers to figure out the amount of weight you’ll need on you. 

In freshwater, most divers need 6 to 8 percent of their body weight in added weight, but in saltwater (which is denser and will add buoyancy), this figure is closer to 8 to 10 percent. This number is a good starting point to calculate your weight amount further.

Part of determining your body weight is weighing your buoyancy compensator (BCD), dive jacket/ Rebreather. It is a significant source of buoyancy as most of them, especially older models, have a lot of padding that will make you float.

To determine the buoyancy of your gear, immerse it in water and release any air that might be trapped inside. Move it around underwater when you float test it, same as when you get into the water make sure you get all the air out so there are no bubbles, halfway thru your dive.

Test Your Weight

Go through a trial run in a swimming pool and wear all of your dive gear. If you can’t wear your full equipment, make sure to put on the closest approximation to what you’ll be wearing for the specific dive. Remember that if your dive is going to be in saltwater, you’ll need a bit more weight compared to a freshwater swimming pool. 

Here it is broken down.

1. Before the dive, float motionless in deep water.

2. Deflate all the air out of your BCD/ Rebreather.

3. Take a normal breath and hold it.

4. If you start sinking – you need less weight. If you find yourself bobbing out of the water – you need more weight.

5. Repeat the process until you are floating as close as possible to eye level.

6. If you are floating at eye level with all you gear on, that is what you want. Have weights by the side of the pool so you can add or subtract weight as you check yourself out. They make weights with snap links or have weights with some 550. Have a carabiner so you can hang them on your weight belt or if you have a weight belt with pockets, you can add or subtract weights as you need. Lastly, a good logbook can go a long way to help with what you will need.  

Use a Dive Weight Calculator

While manually figuring out the right amount of dive weights to gear up in works for many divers, others find it easier to use an actual calculator. Try using a SCUBA diving weight calculator. You’ll be able to find tons of calculator websites online. Enter the figures for the required fields and check if the suggested amount of weight works for you.  

www.divestock.com/calc/weight/weight

Take 10% of your body weight in lead

A common rule of thumb, adhered by many divers, claims that a diver must carry weights equivalent to 10% of his body weight. While that does give you a specific range of the number of weights you need, it does not take many relevant factors into account. 

Factors such as muscle, fat, height, gear, and exposure suit are crucial when choosing weights and should be taken into account. For example, muscles sink and fat floats. A muscular man weighing 180lbs would probably need much less than 18 pounds of weight (even with a long 5mm), whereas a short stalky fellow weighing 180lbs might actually need more than 18lbs. This rule has led to many overweighted divers.

Don’t be overweight!

Many newer divers, and even some of the more experienced ones, dive with too much weight, either consciously or without knowing. Being overweight can lead to some bad situations. Sinking too fast is a common cause for ear problems. Now if you are overweight, you will add air to your BCD, now when you head to the surface to take a peek you will be pushed up faster than you want to go. You will also feel like you have to swim fast all the time, to stop yourself from sinking, and you will breath more air then your swim buddy.

Too much weight will also affect your body position, sinking your lower body and causing you to swim up. Even if you do manage to balance yourself properly, you will have much more drag through the water. Swimming downward for half of the dive does not look cool and looking cool is half (or more) the job.

SCUBAPRO Sunday – Knowing Your Pace

Sunday, August 30th, 2020

You should always know your pace, you will want to know how far each kick takes you, or you will want to see if it is the same as it has always been. If you have not been in the water in a long time or you have new fins. Here is how you go about finding/ checking your pace. It is basically the same as you would for checking your pace on land.  

 You will need to have a place you can do this. Next to a pier is a great place, as it will help save some steps. You will need the following gear.

• One hundred yards of line or you can use a wall that is that long. You will still want to mark it. You will need.
• A compass/ Navigation Board
• A stopwatch
• A slate so you can write your times down.

It would is best if you put markers on the line to help mark your time and pace, generally at the quarter, the halfway, and three quarters. This way, it will give you an idea of how fast you are going and help you to adjust if needed. Put something that floats, so that way, you can see it if the bottom gets steered up. Cyamlights, in a Gatorade bottle, works well for this. Secure the line to the bottom. If you have access to something stationary like a pier or dock, it makes it more comfortable to follow along with it. Ensure both ends are as secure as possible because some people tend to pull on the rope while doing this. It may be easier if you can keep your line close to the bottom (not always possible) because it’s easier to identify if the rope is relatively horizontal to the bottom as compared to in free water. Try to set up your rope parallel to any current, although it is best to do this in an area where the currents are mild. 

Swim normally from one end to the other while counting your kicks. When you reach the end of the rope, write down the number of kicks you did on your slate. Naturally, repeat this several times. Some people do this exercise at double their average speed because they are task-focused, but this is not a realistic representation of how you would typically dive. Like doing your pace on land, you can count every time your left foot goes up or your right or both. If you are only counting one, then you might tend to push harder on the leg. So be aware of that. Use the stopwatch to adjust how long this takes you. You want to do the 100yards in 3 min.  

Do this at least twice so you can average between swimming into the current with swimming with the current. The more time you do this, the better and you are more likely to relax, the more you do it.  

Now, take the average of all of your samples and divide that number into the distance traveled. If you averaged 50 kicks to go 100 yards along the line, each fin kick you make averages just over seven and a half feet in distance traveled. This will help with any time you need to cover a certain distance. You will also want to do this if you are using things you have not used before. For example, if you are carrying heavier gear, a Ladder with a hook for breaching gear or a waterproof bag.

SCUBAPRO Sunday – Binoculars for Use on the Water

Sunday, August 23rd, 2020

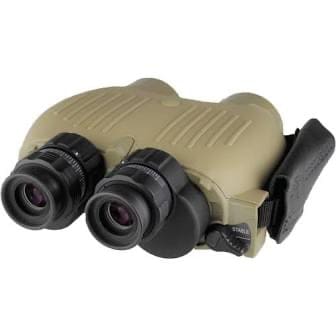
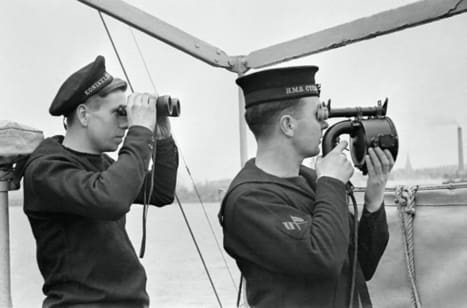
Binoculars are one of the most important things to have when you are on the water. It one of the only times you will truly be in the wide open for everyone to see you and if you can’t see them you are at a big disadvantage. When it comes to selecting a good pair of binoculars for use on the water or in the field, there are a lot of things to look for. Most of the time, if you are not a sniper, you really don’t understand or care what all this stuff means. But here are a few things you should know to help you choose the right ones for the job.

• 7 x 50’s and 8 x 32’s
• What about prisms
• Are coated optics important

Binoculars are described using two numbers, such as 7 x 50 or 8 x 25. The first number identifies the magnification or power. The second is the diameter of the objective lens (the lens at the front) in millimeters. Magnification power describes how much closer objects appear when you view them. In a 7 x 50 binocular, the image is magnified seven times. Increased magnification reduces the brightness of the image, so as magnification increases, binoculars require increasingly larger objective lenses to maintain brightness. The larger their size, the more light they can gather. 

Magnification: Many binoculars used on land have too much magnification for use on a non-stable platform. The more an image is magnified, the harder it is to keep an object in view, so 7x power is the practical magnification limit for small boats (under 50′). Image stabilizing binoculars allow comfortable viewing with much higher magnification, up to 18x power, because they automatically compensate for movement.

Waterproof construction: With the combination of water, salt, and changes in temperature, it will cause the interior lenses of a non–waterproof binoculars to fog. Waterproof construction, with the internal O-rings, sealed and filled or “charged” with dry nitrogen, combined with flotation in the strap, to help protects your binoculars if they are dropped overboard.

Rangefinders are handy for taking bearings or determining approximate height of or distance to an object.

Do you need a built-in compass or rangefinder reticule?

Bearing compasses: Built-in compasses, which appear superimposed near the image you see through the lens, lets you take bearings from an object that is very far away. They are highly recommended for marine use.

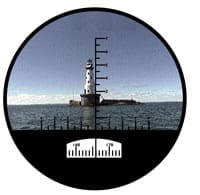
Rangefinder reticule: If you know the height of an object, such as a hill or navigation marker (often printed on charts and maps) and can measure the angle to its top using binoculars equipped with a rangefinder reticule, you can calculate your distance from that object.

Individual focus, center focus, or fixed focus?

Binoculars may have independent eyepiece focus to compensate for the differences between eyes and for different distances. In center-focus binoculars, one eyepiece adjusts to accommodate the difference between your eyes. A central focus knob then adjusts both sides simultaneously for distance.

Steiner Binoculars use a fixed-focus system, with a very deep depth of field, called Sport Auto-Focus. With Sports Auto-Focus, once you’ve adjusted your ocular settings for differences in your individual eyes, you won’t need to adjust the binocular again for varying distances. You’ll get a sharp, clear picture from 50′ to infinity. This set-it-and-forget-it system works well.

Relative brightness: How bright an image appears is a function of the quality of the optics and the ratio of the objective lens diameter divided by the magnification, squared (50 ÷ 7)2. So, 7 x 50 binoculars have a relative brightness of about 50, while 8 x 23 binoculars have a relative brightness of only 8.2. Objects will be visible in far less light with the 7 x 50 models.

Light transmission efficiency: Cheap glasses may allow only half the light entering the objective lenses to reach your eyes. Good quality glasses pass about 75% of the light. Truly exceptional binoculars, such as top models from Steiner and Fujifilm, pass more than 93% to 97% of light to your eyes, making all objects appear brighter. Quality optics also make the image sharper. Inexpensive glasses may produce astigmatic images that are fuzzy at the edges. Superior glasses are sharp from edge to edge and are less fatiguing to the eyes when used for extended periods.

Lens coatings.  When light enters or leaves a piece of glass, about 5% is reflected back. With as many as 16 air/glass surfaces inside your binoculars, there could be a lot of internal light bouncing around, reducing the brightness, sharpness, and contrast of the image. Lenses are coated using one or more thin layers of chemicals (most commonly magnesium fluoride), reducing this internal reflection from 5% to 1% or less. But not all coatings are the same. If you look at the outside lens surfaces, quality lens coatings will appear as subtle tints of violet, blue, or green. Heavily colored lenses in cheap glasses actually reduce the amount of light transmitted. Also, better binoculars include more layers, with more complex chemical combinations, on more surfaces, to achieve light transmission efficiency.

• Coated: one or more surfaces coated with a single layer.

• Fully coated: all air-to-glass surfaces are coated with a single layer.

• Multi-coated: one or more surfaces coated with multiple layers.

• Fully multi-coated: all air-to-glass surfaces are coated with multiple layers.

Field of view The field of view describes the width of the image you see, measured in feet at the distance of 1000 yards. Binoculars offering 385′ field of view show the viewer a cone that is 385′ wide 1000 yards out. Higher-powered image-stabilized binoculars provide a narrower field of view (200–340′) than conventional units (up to 430′).

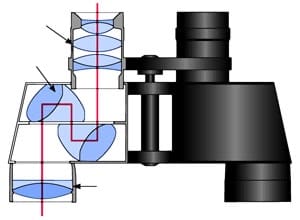
Prisms are used to invert and magnify an upside-down image, are either Porro (binoculars with a dog-leg shape) or roof prisms (with straight tube configuration that is easier to hold). There is some disagreement as to which is best, but it’s generally believed that Porro prisms yield superior optical performance. They transmit more light, resulting in brighter images, and provide better depth perception, because their objective lenses are farther apart. However, some roof prisms with phase shift coating provide excellent performance.

Image-stabilizing binoculars

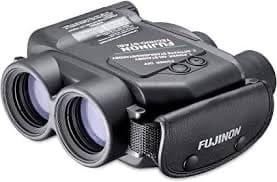
Image Stabilizing (I.S.) binoculars provide a steady image, even on a Zodiac that is not stable. The rolling, pitching and bouncing motion on a boat makes it hard to keep an image in focus using binoculars. I.S. binoculars automatically compensate for movement on a non-stable platform, like a boat, helo, or a side by side to deliver a stable image, even at high magnifications.

There are a few companies that make I.S bino’s, and they all basically work the same but, every company is a little different. Fujinon’s Techno–Stabi IS binoculars are built with dual piezo–motion sensors and gyro position sensors that are linked to direct drive motors for instant and continuous stabilization with low battery drain. The Techno–Stabi achieves a high degree of stabilization in all planes. Two direct-drive motors–one horizontal, one vertical–each controlled by its own piezo vibration sensor, instantly stabilize the image. Phase–coated roof prisms help provide clarity. Power consumption is minimal, and they are advertised as waterproof.


Nikon’s StabilEyes binoculars and Fraser Optics binoculars and monocular are built with a digitally stabilized gimbaled servo system to provide a view that is unaffected by handshake or vibration. The StabilEyes provide constant stabilization when activated, and Nikon’s original dual-mode system allows for use on land and sea by compensating for both roll and shake. The StabilEyes line is also completely waterproof and fog proof. The power consumption of the AA batteries is minimal in spite of the constant image stabilization functions.

The Wing Group Announces Scott Williams as VP Defense, Business Development

Thursday, August 20th, 2020

Lafayette CA, The Wing group (Wing Inflatables, Inc.) announces the appointment of Scott Williams as its new VP Defense, Business Development. Expanding its team to deliver exceptional innovative inflatable solutions to maritime professionals.

No stranger to the mission of building confidence and saving lives, retired Master Chief SEAL Scott Williams joins the team after a distinguished active career in the service spanning 24 years.

After retirement Scott moved into program management for USSOCOM, Program Executive Office, SOF Warrior in Natick, MA working on projects for the warfighter.  He ran six programs, from cold weather clothing to backpacks, culminating with his most significant program, Tactical Combat Casualty Care (TCCC). The program was developed from the ground up, testing and fielding a “doc-in-the-box” system that could be air delivered around the world. 

The TCCC program was awarded the Better Buying Power award for Defense – the most prestigious acquisition award presented by DOD.

Moving into consulting for maritime and aerospace, Scott then led a specific effort to build and deliver an inflatable wall system to military and law enforcement worldwide. Allowing them to train for active shooter in their own backyard.  

“I met Scott when he began consulting and knew straight away that it would be a privilege to have him on our team.  It would be a matter of opportunity and timing. Those two aligned this year, after the acquisition of Mustang Survival. We’re excited to have Scott join us and his background and experience will enable us to focus on aligning our business development efforts across all elements of the Wing Group” – Andrew Branagh, CEO The Wing Group

“The Wing Group of companies are best in class at providing innovative inflatable and safety solutions for those who lead the fight both here and abroad. Being part of a team that provides the highest quality gear required to complete missions safely and return each night to their loved ones is a role I’m proud to be a part of.” – Scott Williams, VP Defense – Business Development.

Scott Williams – swilliams@winggroup.com

www.inflatablesolutions.com

SCUBAPRO Sunday – The D-Mask

Sunday, August 16th, 2020

The new SCUBAPRO D-Mask is a, premium mask designed for all types of diving. It is equipped with UV+420cutTM lenses that filter out high-energy visible (HEV) light and UV light without affecting how colors appear underwater. It is the only premium mask that features an interchangeable lens system for optional optical lenses.

Mask has rotating buckles that work with a new black-on-black Comfort Strap to optimize range of motion and achieve a comfortable, watertight fit. The D-Mask has all the standard features you would expect in a quality mask, such as a double feathered edge silicone skirt, wide strap design, easy to reach nose pocket for ear equalization, dual tempered glass lenses for safety and ribbed skirt and nose pocket for sure grip even when wearing thick gloves.

The lenses of the mask are made from an ultra-clear glass. Standard glass has a green tint. The green tint you see is the result of iron impurities left over in lower quality float or window type glass. That green tint distorts true colors and blocks-out some of the light that reaches the eye. Ultra-clear is a new and exciting optical quality tempered glass with exceptional clarity and high light transmission, with no color distortion. The exceptionally high light transmittance and lack of distortion in the ultra-clear lens maximize the light available for improved visual acuity, especially underwater in low light conditions. Better vision and more accurate colors are what you get with SCUBAPRO ultra-clear lenses. 

The mask comes in a durable molded fabric protective box, a HUD hands-free dive computer mount, and an all-black Comfort Strap.

CHOICE OF SKIRTS Three skirt sizes – Small (Narrow), Medium, and Wide – ensure a perfect fit for a range of divers and face shapes.

COLOR KITS Are available to match perfectly to SCUBAPRO suits, masks, HYDROS BCDs, and Seawing Nova fins.

UNRIVALED LENS CLARITY
True color UV protective lenses offer protection from UV light on the surface without affecting colors underwater.

OPTICAL ENHANCEMENT
Interchangeable lens system makes it easy to install optional optical lenses (ranging from -1.5 to -5.0 or +1.5 to +4.0 in .5 diopter increments).

ADD-ON BI-FOCUS
Optional magnifiers can be bonded to standard lenses with a range of +1.0 to +3.0.

www.scubapro.com

SCUBAPRO Sunday – Mask Squeeze

Sunday, August 9th, 2020

When you first start diving, sometimes little things will happen, which most likely will not occur as you gain more experience like forgetting to bring an extra mask.  Sometimes It can be a little most serious like you might forget to do a proper purge process, and you get to depth, and you pass out. Your dive buddy has to pull you to the surface and think he is getting kicked out because he is a new guy like you, and he believes he killed his swim buddy. Other things can happen that are a little more series. It can cause some harm if you are not careful, and it will make you look like you have to hickeys on your eye. It is a good thing if it is around Halloween, you will look like a zombie and not a cool one like the Walking Dead. It is a mask squeeze or for the corpsman in the group called facial barotrauma.

What is Mask Squeeze?

A Mask squeeze can occur with the incorrect equalization of the air pressure inside your mask, causes it to compress tighter against your face, causing the small blood vessels around the eyes to burst. If you don’t know how this feels, it’s like the covered areas of your face get sucked into the mask as the negative space between them gets smaller. While all dive briefs should t divers are usually warned about during Open Water Diver courses, many don’t pay too much attention to it after underestimating the trauma that it can cause. So unless you’re willing to surface with scary, bloodshot eyes, you’ll want to remember what not to do and what you can do to prevent it from happening during any of your dives.

How Does Mask Squeeze Happen?

Several things can cause an unfavorable change of mask pressure. The most common is failing to exhale into the mask during descent. Many divers remember to equalize their ears since ear discomfort becomes increasingly noticeable as you dive deeper. Still, they may not realize the increase in scuba mask pressure until after they surface.

Other factors that increase the likelihood of mask squeeze from diving are poor dive mask fitting (particularly if you choose a mask that’s too small for your face or too tight, to begin with) and fast descent. As you can imagine, it can be easy for a diver to forget the steps to take to prevent mask squeeze, especially for beginners who are worried about getting air into the mask.

Dangerous Effects of Mask Squeeze

Divers who suffer from mask squeeze may notice bruising around the eyes, blood spots over the white areas of their eyes, and swelling. Fortunately, it rarely causes injury inside the eyeball. Divers often get alarmed and panicky when they see blood in their eyes. Still, the condition isn’t as dangerous as it looks and usually clears away without any significant mask squeeze treatment.

In the most severe cases, the hemorrhage can last longer, or you might notice a loss of vision or pain, in which case you should visit a doctor straight away.  

Avoiding Mask Squeeze

Prevention is always better than cure, so every diver needs to remember how to use their masks properly and avoid mask squeeze.

First, never wear masks that cover only the eyes. While those may be suitable for snorkeling, you’ll need a mask that can be equalized if you’re swimming at greater depths. Fortunately, modern dive masks have nose valves that allow divers to quickly equalize the air space between their mask and face without the risk of flooding it.

Next, don’t choose a mask that feels tight, to begin with. Once you descend, the pressure automatically causes an increased suction on the mask. A scuba mask should sit comfortably on the diver’s face and stick when mild pressure is applied even without the strap being worn.

To help prevent bruising, a soft silicone skirting is also a must, so the mask will comfortably cushion and spread the pressure around your face.

Finally, don’t descend too fast and make it a habit to equalize. Instead of being worried about water getting into your mask, it helps you get comfortable taking off and putting on your dive mask underwater.

Through practice and with the presence of mind, you can easily avoid mask squeeze and enjoy much safer dives.

What is mask squeeze? 

Like the air spaces in your sinuses and ears, you must also equalize the air space in your mask as you descend. When you descend, failure to equalize, or add air to the air space in the mask, by exhaling through your nose, can create unequal pressure between the mask air space and the vascular pressure within the blood vessels of the face. This can result in various degrees of facial barotrauma, or injury to the soft tissues of your face contained within the mask. Imagine your face in a suction cup. The soft tissues beneath the mask and especially around the eye, swell (periorbital edema) and discolor, such as redness or bruising (ecchymosis).

What treatment do I need?

Unless you are experiencing eye pain or visual problems, there is no treatment for facial barotrauma except time. Because it is a bruise, your body will eventually reabsorb the effect of your mask squeeze. Your physician or an eye specialist should immediately address eye pain or visual disturbances such as blurred vision or loss of part of the visual field. These symptoms would be extremely rare in mask squeeze, however. The signs and symptoms of mask squeeze can take up to two weeks or more to resolve. Unfortunately, it is one of those conditions where you will probably look worse than you’d like before it gets better. Not only will blood and edema needs to be reabsorbed, but it tends to be gravity-dependent – which means it will spread downward on your face. Before you heal, you may look like a red-eyed black-and-blue marked creature in a B-grade horror flick or a boxer that took at least two too many punches.

Who gets mask squeeze?

Mostly new divers get squeezed – they tend to be overwhelmed by all the skills they need to remember, such as buoyancy control and equalizing their ears and sinuses, all while being mesmerized by the mysteries of the sea. More experienced divers, however, are not immune to mask squeeze. They tend to have mask squeeze when they concentrate on some new activity or focus on a task that diverts their attention from clearing their mask. Changing to a new mask or to a low-volume mask may also lead to mask squeeze, because the diver may not be accustomed to when to add air. Finally, poor-fitting masks or other issues such as facial hair may lead to problems with equalizing.

How do you prevent mask squeeze from happening again? 

The solution to preventing mask squeeze is to remember to keep your nasal passageways open during descent. By exhaling through your nose and using a properly fitted mask, you will minimize facial barotrauma risk. A mask should fit comfortably against your face, and you should be able to achieve an appropriate seal by gently placing the mask on your face and inhaling through your nose. The mask should seal to your face and not fall off even without the mask strap in place. It is not unusual for a small amount of leakage to occur while diving, especially if you have facial hair. Exhaling through your nose and tilting your face towards the surface while cracking the mask’s lower seal will generally remove any unwanted water from your mask.

Mountain Horse and NP Aerospace Selected for US Navy Maritime Body Armor Contract

Thursday, August 6th, 2020

LASA LWB III+ IC06 MBP Maritime Buoyant Plate

Mountain Horse Solutions, a U.S. Defense and Mission Critical Equipment Supplier, based in Union City TN, and NP Aerospace, a ballistic hard armor company, have been awarded a four-year U.S. Navy Maritime Buoyant Plate body armor contract framework valued at over $20m.

Mountain Horse and NP Aerospace will supply up to 11,000 of the LASA LWB III+ IC06 MBP Maritime Buoyant Plates, which are lightweight and feature a highly durable waterproof Polyurea coating. The contract framework is for a four-year period and has a maximum value of $20,599,334. Mountain Horse and NP Aerospace were selected due to their ability to meet U.S. Navy strict performance requirements.

Mountain Horse, a key supplier to the U.S. Armed Forces and Government Agencies, selected NP Aerospace as hard armor manufacturer due to the company’s extensive experience working with global defense organizations including Canada’s Department of National Defence and the UK Ministry of Defence. NP Aerospace has supplied over 200,000 body armor plates to British and Canadian Armed Forces, more than 1 million ballistic helmets and armor systems for over 2,000 NATO vehicles used in overseas operations.

Chris Witts, Director, Mountain Horse Solutions, said: “We are thrilled and honored to be awarded this contract. Supplying the U.S. Navy with a top-quality critical safety product, like the Maritime Buoyant Hard Armor plate, is a significant achievement. Mountain Horse Solutions is an expert in supply chain management and prides itself in providing the US Armed Forces with the highest quality and most innovative equipment available. This award confirms the strength of Mountain Horse Solutions’ partnership with NP Aerospace and our commitment to supplying rapid response innovative solutions to the military.”

James Kempston, CEO, NP Aerospace, said: “Being awarded the U.S. Navy Maritime Buoyant Plate body armor contract is a testament to our experience in composite armor technology. Our personal armor has been used by frontline allied forces for over 25 years.  We are proud to be supporting Mountain Horse and the U.S. Navy in supplying our troops with the lightest weight, highest performing, top quality products in the market. The LWB III+ IC06 MBP Maritime Buoyant Plate is able to comfortably meet the ballistic threat required by the U.S. Navy and delivers the wearability and buoyancy required in maritime operations.”

NP Aerospace is a global armor manufacturer with extensive experience in complex, military programs. The company’s body armor portfolio includes a range of ballistic plates to meet demanding defense requirements from NIJ Level III plates for standard military operations to NIJ Level IV plus special threats plates.

Mountain Horse Solutions and NP Aerospace were awarded the Naval Sea Systems Command (NAVSEA) contract N61331-20-D-0014, as an ID/IQ (Indefinite Delivery / Indefinite Quantity) to provide Maritime Buoyant Body Armor (MBP), both in torso and side configurations.