TYR Tactical

Archive for the ‘Maritime’ Category

Sneak Peek – Tactical Footwear from Deckers X Lab

Thursday, November 5th, 2020

Coming soon from Deckers X Lab…Who, you might ask, is Deckers X Lab? Deckers is the parent behind some powerful footwear brands; Hoka Running Shoes, UGG Boots, Teva Sandals, Sanuk Surf Shoes. Their innovation division (Deckers X Lab) put together a line of boots using technologies found in their high end products.

Launching an AR670-1 line of military boots with inner carbon plates as well as a unique water shoe targeted to any and all things water (OTB, VBSS, GOPLATS, even Canyoneering), its a high end climbing shoe meets water shoe.

The products will see store shelves in 2021.

SCUBAPRO Sunday – D420 Regulator

Sunday, October 25th, 2020

Combining the original D-Series regulators’ iconic design with the latest advances in breathing performance technology, SCUBAPRO engineers have created a 21st-century regulator in terms of quality, reliability, performance, and style.

The new D420 features a brand-new balanced valve inside a housing supported by a full metal structure. Called the Progressive Flow Control Valve, it can deliver excellent airflow for the best breathing performance, with a natural smoothness comparable to what you might experience breathing on the surface. The uniquely shaped fiberglass-reinforced nylon casing is ultra-durable and allows the LP hose to be connected on either the right or left side for maximum rigging flexibility. A new dive/pre-dive system includes a switch on the top of the casing with a thumb tab for adjusting the direction of airflow right out of the valve. The highly efficient purge button is a technical jewel based on a new concept that gives the D420 its unique face — teamed with the MK25 EVO balanced piston first stage, a regulator system purpose-designed for avid and professional divers.

SCUBAPRO has been a Leader in the Evolution of piston controlled first stages since it was started in 1963; the MK25 EVO carries on this heritage with an array of patented features ensuring unfailing performance. The MK25EVO is a balanced piston first stage and is one of the best in its field. It is a superior regulator because of its ultra-stable intermediate pressure (IP), resulting in extraordinarily punctual and constantly high air delivery.

Air balanced, flow-thru-piston first stages with air balanced pistons deliver significantly more air to the second stage than any other first stage. At the same time, their performance is totally unaffected by the changing tank pressure. A balanced piston allows the use of lighter and more sensitive components, resulting in ultra-fast breathing response, instant delivery of air on demand, and extra-high airflow, especially in low tank pressure ranges. This benefits a tired diver giving them a smoother breathing regulator during all stages of the dive, from the descent to the ascent or deco stop. Balanced piston first stages are the first choice of demanding sport divers and professionals. A balanced piston performs equally in warm and cold-water environments.

Cold Water Diving conditions can be different, including extreme cold water and outside temperatures, posing the possibility of a regulator “freezing.” Therefore, resistance to freezing is imperative for the diver. The MK25 EVO regulator uses SCUBAPRO’s new Extended Thermal Insulating System (XTIS). The SCUBAPRO MK25 EVO first stage regulator meets the new EN250-2014 requirements for cold water diving, CE approved for 3360psi (230 bars). This model goes even beyond this super stringent qualification and has successfully been tested in extreme cold diving conditions at less than 36°F (2.2°C). The freezing resistance has been increased by 30% over the previous MK25 regulator first stage. SCUBAPRO has achieved this with some new design features. The new MK25 EVO has a proprietary thermal insulating coating on key internal components and an encapsulating main spring bushing that resists the cooling effect in previous MK25 first stage regulators, also; as a specific anti-freezing measure; our engineers have designed a patented finned cap with additional body fins for the MK25 EVO first stages for optimal-cold water diving. The fins (ribs) of the XTIS act as a radiator to increase the surface area of heat transfer from the water to warm up the internal parts that have been drastically cooled down by the gas pressure drop. The new MK25 EVO has a bigger body cap, a new body with insulating bushing and ribs, a new antifreeze cap patented isolation system with all internal parts fully insulated to improve cold-water performance dramatically.

The MK25 EVO is manufactured from marine grade chrome plated brass and offers a balanced composite/stainless steel flow-thru piston that would make any diver proud. It demonstrates SCUABPRO’s dedication to quality and creating positive diving experiences.

SCUBAPRO Sunday – Operation Flipper

Sunday, October 18th, 2020

Operation Flipper was a raid by the Combined Operations to kill Field Marshall Erwin Rommel at his headquarters in Sidi Rafa, Libya, that would take place between10-19 November 1941. The attack would use man from Combined Operations, Special Boat Services (SBS), No. 11 Commando, Long Range Desert Group (LRDG), and also the man from the Special Operations Executive (SOE) G(R). This raid was to be a smaller part of a more significant campaign to relieve Tobruk and push the Axis from North Africa.  

The operation had four main objectives, first and foremost was to kill Rommel at his headquarters, destroy the nearby Italian headquarters and its communications network, sabotage the Italian Intelligence Office in Appolonia and its communications network between Faidia and Lamdula, and lastly, conduct general sabotage actions elsewhere in the Axis forces rear area. 

Leading the mission was Colonel Robert Laycock. His second in command was Lieutenant Colonel Geoffrey Keyes. On November 10, 1941, Laycock’s six officers and 53 men boarded the submarines Torbay and Talisman and left Alexandria harbor for Beda Littoria, Cyrenaica. Waiting for them on the beach was Captain Jock Haselden and an Arab soldier from the SOE’s G(R). They would guide the folbots (early versions of Klepper type canoes) to the beach and help them ashore. Once ashore, they would meet up with the rest of Haselden man, including two more Brits, a free Belgian, and another Arab soldier who stayed further inland; all had been dropped off by the LRDG earlier that day. Haselden’s team had local knowledge of the area; one of the Arabs would lead the assault team to the target while the rest of Haselden’s team would sabotaging the communications. Keyes got himself and all his men ashore. But as Layton and his men prepared to disembark, a storm struck. Heavy seas drove Talisman aground, and only Layton and seven men reached the beach.

With his force cut in half, Keyes modified the plan. It would be a two-part assault; Keyes would attack Rommel’s HQ, and Lt. Roy Cooke would lead the Italian headquarters’ attack. Layton and a small force would defend the force’s escape route. On the evening of November 15, Keyes, Cooke, and their men headed inland. Despite the weather, the groups managed to reach their respective launch positions on the evening of November 17. At midnight, they attacked. Keyes, leading a three-person assault team, burst into the villa identified as Rommel’s headquarters. They surprised a German officer who was killed as he struggled with Keyes. The attackers then rushed down the hall, and Keyes opened a room where ten Germans were arming themselves. One of the Germans shot Keyes, killing him. What the team didn’t know was that Rommel had left the compound a week earlier for Rome. After Keyes’s death, things started to get worse.  

Campbell was shot in the leg by one of his men. He passed command to Sergeant Jack Terry and remained behind. Terry gathered the raiding team and retreated with 17 men to rejoin Laycock at the beach. Cooke’s men encountered a platoon or so of Italian police paratroopers. The Italians had been searching for the British raiders close to the village Mansura north of Cyrene. With the Italian and Germans looking for the raiding party, Laycock knew it would be impossible to re-embark on the submarines as they waited for the weather to improve. They were discovered and exchanged fire with local Italian and German troops. Low on ammo and aware that they could not stand off a larger force, Laycock ordered the men to scatter. Laycock and Terry made it to safety after 37 days in the desert. Bombardier John Brittlebank, one of the SBS teams who had guided the commandos in the folbots, escaped and survived alone in the desert for forty days until Allied troops picked him up. The rest of the raiding force was captured, some of them were wounded.  

The raid was considered a failure by the British high command, but to the Germans, especially to Rommel, it showed what the Combined Operations could do. It would also help Winston Churchill decide to put the Commando’s and other groups under the SOE after the British military decide they didn’t need them anymore. Rommel was quoted as saying, “It was a brilliant operation and with great audacity.” Rommel ordered that Keyes and all the rest of the Commandos be buried with full military honors, sending his personal chaplain, priest Rudolf Dalmrath, to officiate. He had cypress crosses and wreaths made for the British and German dead. Rommel also instructed that photographs be taken of the ceremony and Keyes’ grave and sent them to his parents, a chivalrous act that increased British respect for him. British Special Operations would continue to wreak havoc thru out the Africa Theater of Operation, significantly contributing to the Allies victory.  

SCUBAPRO Sunday – X-Black BCD Tactical

Sunday, October 11th, 2020

The SCUBAPRO X Black BCD is new to the BCD line this year. It is SCUBALabs Tester choice best new BCD for 2020. So, as SCUBAPRO continues to move forward in the Military and Public Safety market it was an obvious chose to start this year by adding Molly to the newest member of the SCUABPRO Family.

The SCUBAPRO X Black Tactical is a front-adjustable BCD that comes equipped with SCUBAPRO AIR2 V Gen Breathable Inflator. It also has SCUABPRO’s exclusive AirFlex system, basically it helps simplifies buoyancy control and helps guarantee an extremely stable dive. It has a Super Cinch tank buckle system that locks the tank in for maximum stability at depth. It can also be converted to use twin tanks. Quick-release integrated weight pouches ditch quickly and easily and secure with buckles.

Each weight pocket holds up to 12 lbs. (5.44 kg) of hard block or soft pouch lead weights. Two optional rear trim pouches allow you to achieve a well-balanced level position. Each rear weight pocket holds up to 4 lbs. (1.8 kg) of hard block or soft pouch lead weights.

Built-in grommets provide attachment points for a knife or they can be used to secure gear to. Three large zippered pockets and a zippered cummerbund pouch provide lots of cargo-carrying capability. Eight aluminum D-rings, four large and pre-bent, provide convenient clip-on points for extra gear. The BCD has multiple adjustments for a perfect fit, including torso adjustable shoulder straps, adjustable sternum and waist straps all equipped with squeeze-style” side release buckles for ease of donning and doffing.

The waist strap is also equipped with a comfortable cummerbund. There is a right shoulder and right lower rear over-pressure relief/pull-dump valves, both equipped with pull cords for ease of trimming buoyancy. Built to be durable, and extremally stable, the X-Black Tactical can handle even the most aggressive diving. It is constructed from a combination of durable 1000 denier and 420 denier nylon for long-term wear. Adjustable cummerbund compensates for suit compression, ensuring a snug fit at varying depths. Non-rotating quick-release shoulder buckles optimize strap routing to maximize fit. AirNet backpack is water-draining and comfortable during long dives. 

The SCUBAPRO AIR2’s are an air balanced power inflator that provides smooth and reliable inflation at all tank pressures. Single hose configuration eliminates the need for a separate alternate air source. Innovative dive/pre-dive switch enables you to detune the unit when not in use, eliminating free flows. Self-flushing mechanism requires just one push on the purge to clear away all dirt. The regulator mechanism is a simple, yet reliable classic downstream demand valve. The AIR2 is equipped with an ergonomic mouthpiece with large bit tabs, soft second-stage cover and one button purge function. The regulator’s pre-tuned system is housed in a precision molded carbon fiber and techno-polymer impact resistant design that weighs 6.7 oz. (190 g). Nitrox compatible up to 40% out of the box. The demand valve is chrome plated brass with a stainless-steel spring and a silicone rubber diaphragm and exhaust valve. The Air 2 comes with a 3/8″ threaded 27.56″ (70 cm) high-flow low-pressure hose and owner’s manual. CE certified (EN250A — greater than 10°C/50°F warm water test controls) as a second stage regulator.

For more information please contact Ed Rasmussen  ecrazz@clannfive.com  

Virtual Warfighter Expo – Rocky Dive Boot

Tuesday, October 6th, 2020

During the ADS Federal Range Day we gave you a sneak peek at a new boot from Rocky. Turns out, it is their Dive Boot.

Features:

• High Performance Quick Dry Fabric
• Abrasion Resistant Superfabric
• Quick Dry Laces
• Fast Drain Polyurethane Footbed
• Side Stitch Durable Construction
• Drainable Polyurethane Outsole
• Mega Grip Vibram Outsole
• Mid Cut Fin Friendly Drainable Footwear

Offered in Black and Coyote Brown. M/W 3-16 Whole sizes only.

Units and agencies can procure all products shown during Virtual Warfighter by contacting ADS Inc.

www.rockyboots.com

SCUBAPRO Sunday – Finning Techniques

Sunday, September 20th, 2020

Finning is the process of generating propulsion. In that sense, it is probably the most basic of all the diving skills, and one that most of us are already able to do when we first start diving.

In particular, a better finning technique, choosing the right technique for the right circumstances, can increase your dive’s efficiency.

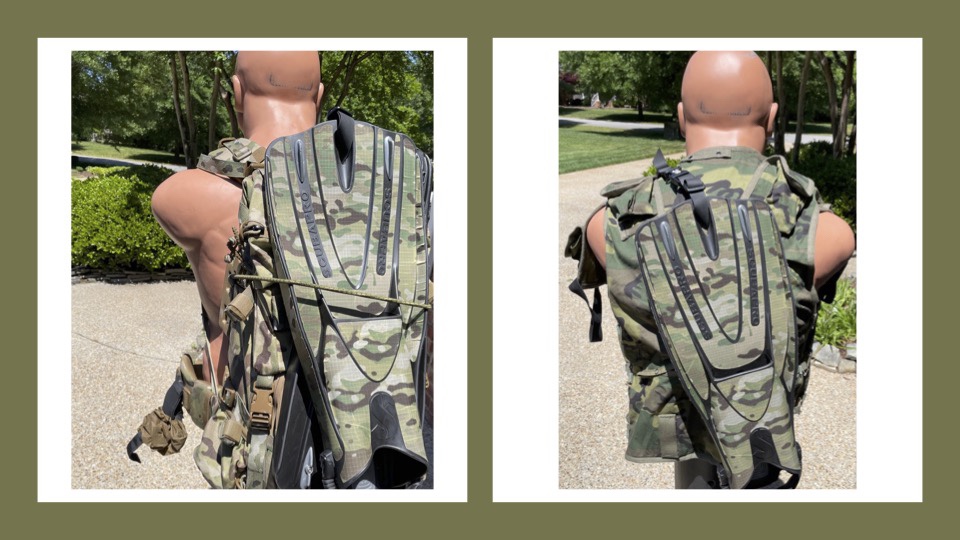
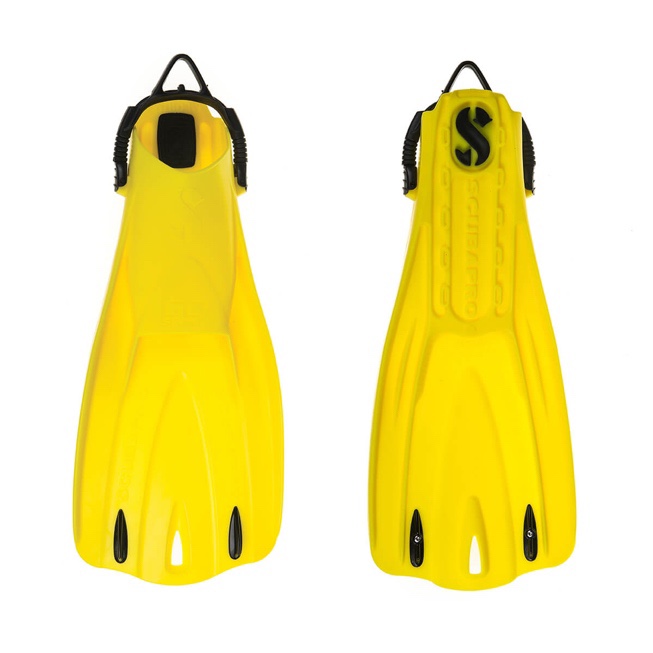
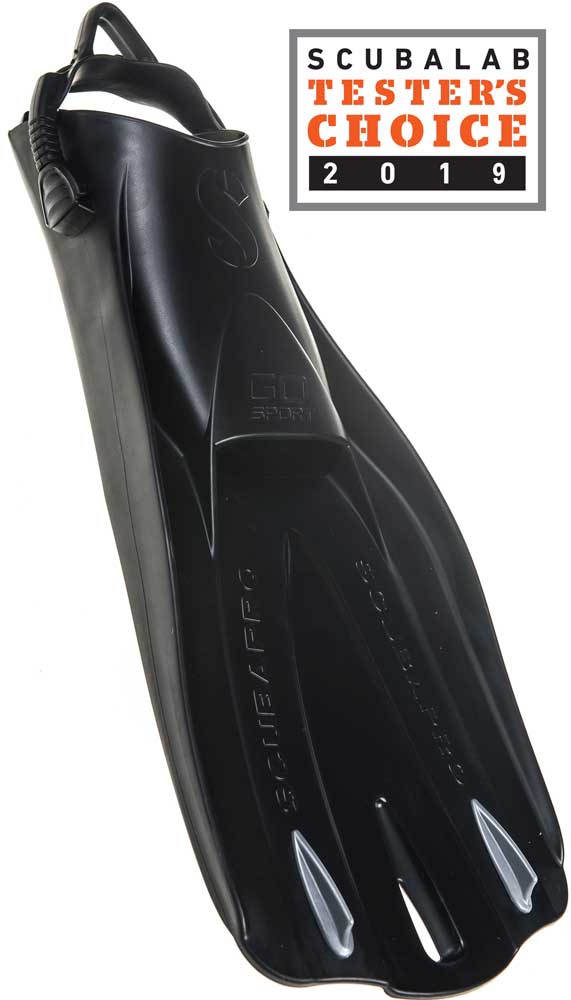
This will decrease your air consumption, reduce physical fatigue, and extending your dives. Picking the right finning technique will also decrease the amount of silt you turn up. I am going to talk about four types of SCUBAPRO fins. The Jet fin, the Seawing Nova Gorilla, The Seawing Nova, and the Go Sport fins. The Jet Fin is the most wildly used fin in the world by profession divers, the SeaWing Nova, the SeaWing Nova Gorillas (a stiffer version of the Seawing Nova that is great for people that who are strong kickers). The Go Sport fin is new to our line and is a tremendous all-around fin for diving, surface swimming like OTB and River and Stream crossing. Lastly are the Twin Jet fins, again a SCUBAPRO iconic fin; it is used by strong kickers that like to use a flutter kick type stroke.

There are three main fin kicks that any diver should know. These are flutter kicks, frog kicks, and bent-knee cave diver kicks.

Flutter kicks

The flutter kick is the basic finning technique that most divers use. This technique is similar to the leg part of freestyle swimming.

Watch 90 percent of all divers, and you’ll see them use flutter kicks. In the early days of diving, it was the only technique taught. The reason for its popularity is quite simply that it is the strongest of all the kicking techniques, and it generates a lot of propulsion. Back in the early days of diving, before the invention of the BCD, speed was the primary way of maintaining buoyancy. The advantage of this kick is the forcefulness of it. It is excellent for moving at high speed or when fighting a current. The legs’ vertical up-down movement also means it is beneficial for wall diving, mainly when diving by a wall covered in corals. There’s less risk of kicking something on the side of you like your dive buddy, coral or the finning’s backwash, stirring up sediment. The disadvantages of this kick are related to the advantages. The forcefulness of the kick means that it is relatively strenuous and increases air consumption because of it. The vertical movement can steer up a lot of silt; this is bad for many reasons. If you are on a combat swimmer operation, the trail of silt can give you away. Second, it will make it hard for anyone following you to see their gauges and find the target. (unless you are using the SCUBAPRO HUD dive computer) (shameless plug, but it is excellent for low visibility). In confined spaces like close to the target around the piers or in a cave, it can cause a blackout and make it very hard to see what you are doing.

A fast, powerful technique is useful when fighting a current, for short bursts of speed. The best fins for this are the SCUBAPRO SeaWing Nova Gorillas, The Go Sports, and the Jet fans.

Frog kick

The frog kick looks very similar to the leg portion of the breaststroke from swimming. A large and wide kick that utilizes the leg’s full strength is a good, general technique for open-water diving, either in the water column or close to the bottom. Because the movement and propulsion aren’t continuous, good buoyancy technique is required, though.

The movement here is horizontal, or close to it, meaning that there is minimal disturbance of the bottom when swimming close to the bottom, which will maintain the visibility for any divers that come after you. However, the kick’s width means that the kick isn’t recommended for caves or when diving close to a wall.

This kick, combined with good buoyancy, will quickly become your go-to technique once you get used to it, and will likely decrease your air consumption significantly. The more adequately trimmed your position in the water, and the more you take advantage of the gliding phase before initiating the next kick, the more you’ll reduce your energy (and air) consumption.

The powerful kick that can be extremely efficient, especially if you master the kick-and-glide aspect. Suitable for open-water diving in mild currents, in the water column, or close to the bottom. Not advisable in stronger currents or close to walls.

The best fins for this are the Jet fins.

Bent-Knee Cave Diver Kick

With the complicated name, this technique is the go-to technique for technical divers and is the one that causes the least disturbance of the environment. The bent knees mean that the movement is minimal, with the entire kick coming only from a small movement in the hips, combined with a kick of the ankles. This means that propulsion is limited, compared to the two kicks above, but it also decreases strain and air consumption.

The small movement means that it works well in cramped areas, such as inside wrecks and caves, and, when executed correctly, can minimize the amount of silt kicked up to almost nothing. For this reason, it is also the recommended technique for diving close a very silty bottom, like in a confined space, close to piers or around ships.

The slow movement also means that this technique helps you slow down, making it useful for muck dives or other nature dives where you’ll be looking for small animal life. Because it is a very low-propulsion kick, this technique has its limitation when swimming against a current, though. This is a minimal-impact kick that is ideal for cramped environments and close to very silty bottoms, as well as helping you slow down during your dives and maximize your available air. The Jet Fin is the best fin this, and with some practice, the Go Sport is good also.

Lastly, the SeaWing Nova Gorillas come in OD Green or Orange, but they can be special ordered in all black. You can also order the SeaWing Nova in all black. Special orders require a minimum of 24 per size, but we can work to get you want you need.

Contact ecrazz@clannfive.com for more information.

Leading Canadian Submersible Robotics Company Launching New Semi-Autonomous ROV System, REVOLUTION NAV

Wednesday, September 16th, 2020


The REVOLUTION NAV package makes locating, tracking and operating an ROV easier than ever before.

August 18, 2020 – Kitchener, Ontario – Taking a big step towards developing a hybrid autonomous vehicle, submersible robotics company Deep Trekker is proud to announce that they are launching a new ROV package, the REVOLUTION NAV. Offering advanced navigation and stabilization, this new package is leading the way in semi-autonomous vehicles. The REVOLUTION NAV package provides pilots with a Google map showing their ROV’s position on screen, allowing users to see where they are, leave a trail to show where they have been and set points of interest to where they want to return to. Furthermore, advanced stabilization features allow operators to station hold against currents, enable auto altitude and pilot their vehicle precisely and accurately through varying water conditions.

Solving harsh environmental situations with fully assembled, tested and ready to use remotely operated vehicles (ROVs), Deep Trekker gets eyes underwater in minutes. With applications in aquaculture, energy, shipping, defense, infrastructure and search and rescue among others, Deep Trekker’s underwater drones are on the leading edge of submersible technology.

“We are thrilled to be launching the REVOLUTION NAV,” shared Deep Trekker President Sam Macdonald. “With this new package, users will be able to know where they are in real time. This advanced navigational tool allows for more complex missions to be successfully carried out by ROV pilots.”

The REVOLUTION NAV’s capabilities are especially useful for applications in open, murky water or when there is significant current. The state-of-the-art features provide benefits across numerous applications for missions requiring precise navigation, location tracking and reporting. Search and recovery teams, for example, will be able to easily see and track what areas have been covered as part of the search. 

“The REVOLUTION NAV uses our BRIDGE technology and sensor fusion to provide station keeping, location tracking and intelligent navigation in addition to real time location data,” explained Macdonald. “We aim for constant innovation and the REVOLUTION NAV allows us to continue to provide advancements to our customers and pave the way towards autonomy.”

The pairing of USBL and DVL with Deep Trekker’s BRIDGE technology and sensor fusion bring this intelligent navigation system to life. USBL systems utilize sonar beacons to triangulate the position of the ROV. A GPS chip inside the Deep Trekker BRIDGE Controller allows the system to correlate the data and provide real time latitude and longitude. DVL offers users an enhanced navigational system by providing pilots with the ability to accurately and conveniently determine velocity relative to the seafloor, allowing for easy navigation through the most complex of operations. 

www.deeptrekker.com

SCUBAPRO Sunday – Weights

Sunday, September 13th, 2020

An essential part of preparing for each dive is calculating the amount of weight you’ll need to ascend and descend safely and effectively. By gearing up in the correct amount of weight, you can successfully maintain neutral buoyancy throughout the dive.

Many factors can affect your buoyancy—your body composition, the equipment and clothing worn, the amount of air you’re breathing, and the water you’ll be swimming in (freshwater/saltwater). Being able to add weights to your dive belt or in the pockets of your BCD can help you minimize drag and make your finning more efficient.

Proper weighting and buoyancy control are crucial if you want to have a successive dive. Unfortunately,there is no extract formula to help say how much weight you should wear on any giving dive. The reason for this is no one is exactly alike. So, all you can really rely on is knowledge and practice, I will say this a couple times a good log will help more then you will know. This goes for anything you do. Always keep a logbook, for land warfare, over the beach, and as much as you can. This will help when it has been a couple of months in between doing things. To help make it easier, below are a few easy steps you can take, preferably with the assistance of a dive weight calculator. Find a formula that works for you and stick to that, but make sure you test yourself before each dive. Also keep a dive log of all your dives. (See told you I would say this a lot) Write down what you wore, what way was the current going to you have to kick harder, were you carrying anything extra like a ladder or breaching tools, and how you felt. Make sure you have water temp, wetsuit thickness, and other information like that. This will go a long way to helping with future dives.

Weigh Yourself and your Gear

A rough approximation of the weight you’ll need can be figured out quickly by weighing yourself and then using those numbers to figure out the amount of weight you’ll need on you. 

In freshwater, most divers need 6 to 8 percent of their body weight in added weight, but in saltwater (which is denser and will add buoyancy), this figure is closer to 8 to 10 percent. This number is a good starting point to calculate your weight amount further.

Part of determining your body weight is weighing your buoyancy compensator (BCD), dive jacket/ Rebreather. It is a significant source of buoyancy as most of them, especially older models, have a lot of padding that will make you float.

To determine the buoyancy of your gear, immerse it in water and release any air that might be trapped inside. Move it around underwater when you float test it, same as when you get into the water make sure you get all the air out so there are no bubbles, halfway thru your dive.

Test Your Weight

Go through a trial run in a swimming pool and wear all of your dive gear. If you can’t wear your full equipment, make sure to put on the closest approximation to what you’ll be wearing for the specific dive. Remember that if your dive is going to be in saltwater, you’ll need a bit more weight compared to a freshwater swimming pool. 

Here it is broken down.

1. Before the dive, float motionless in deep water.

2. Deflate all the air out of your BCD/ Rebreather.

3. Take a normal breath and hold it.

4. If you start sinking – you need less weight. If you find yourself bobbing out of the water – you need more weight.

5. Repeat the process until you are floating as close as possible to eye level.

6. If you are floating at eye level with all you gear on, that is what you want. Have weights by the side of the pool so you can add or subtract weight as you check yourself out. They make weights with snap links or have weights with some 550. Have a carabiner so you can hang them on your weight belt or if you have a weight belt with pockets, you can add or subtract weights as you need. Lastly, a good logbook can go a long way to help with what you will need.  

Use a Dive Weight Calculator

While manually figuring out the right amount of dive weights to gear up in works for many divers, others find it easier to use an actual calculator. Try using a SCUBA diving weight calculator. You’ll be able to find tons of calculator websites online. Enter the figures for the required fields and check if the suggested amount of weight works for you.  

www.divestock.com/calc/weight/weight

Take 10% of your body weight in lead

A common rule of thumb, adhered by many divers, claims that a diver must carry weights equivalent to 10% of his body weight. While that does give you a specific range of the number of weights you need, it does not take many relevant factors into account. 

Factors such as muscle, fat, height, gear, and exposure suit are crucial when choosing weights and should be taken into account. For example, muscles sink and fat floats. A muscular man weighing 180lbs would probably need much less than 18 pounds of weight (even with a long 5mm), whereas a short stalky fellow weighing 180lbs might actually need more than 18lbs. This rule has led to many overweighted divers.

Don’t be overweight!

Many newer divers, and even some of the more experienced ones, dive with too much weight, either consciously or without knowing. Being overweight can lead to some bad situations. Sinking too fast is a common cause for ear problems. Now if you are overweight, you will add air to your BCD, now when you head to the surface to take a peek you will be pushed up faster than you want to go. You will also feel like you have to swim fast all the time, to stop yourself from sinking, and you will breath more air then your swim buddy.

Too much weight will also affect your body position, sinking your lower body and causing you to swim up. Even if you do manage to balance yourself properly, you will have much more drag through the water. Swimming downward for half of the dive does not look cool and looking cool is half (or more) the job.