I will try and tell this story the best I can, but there was a lot that happened during this month of fighting, and not going to lie, I forget how it all happened every time I read about it.
The Tet Offensive was a coordinated series of attacks by the North Vietnamese on over 100 South Vietnamese cities and outposts. The attack was an attempt to promote resistance among the South Vietnamese people and encouraging the U.S. to decrease its participation in the Vietnam War. The ensuing battles were characterized by confusion, gallantry, and bravery for almost one month, 30 January through 28 February. Without losing any strategically important foundation, the United States effectively repelled the assaults by the north in every city except Hue.
Hue City is a center of Vietnamese culture and religion. The city’s cultural prominence during the war made it a place of strategic importance for U.S. forces. The Marines were forced to go home-to-house, for 26 days, carrying out urban operations for the first time since WWII. Hue was challenging for Marines as the Perfume River separates it, and no air support was provided for the first ten days following the Tet Offensive.
Hundreds of Viet Cong (VC) had already entered the city in the days leading up to Tet and had mingled with the pilgrim crowds that were streaming into Hue for a holiday. Their arms and munitions were quickly transported into the vibrant city and disguised in the bikes, cars, and trucks carrying the flood of merchandise, food, and goods intended for the day’s festivities. Like clockwork, the VC unpacking their guns in the middle of the morning of 31 January, and they put their uniforms into their assigned positions in Hue in preparation for connecting them with cracked Vietnamese People’s Army (PAVN) and city-closed VC agents. Infilters gathered at the gates of Citadel to lead their comrades to achieve their primary objectives.
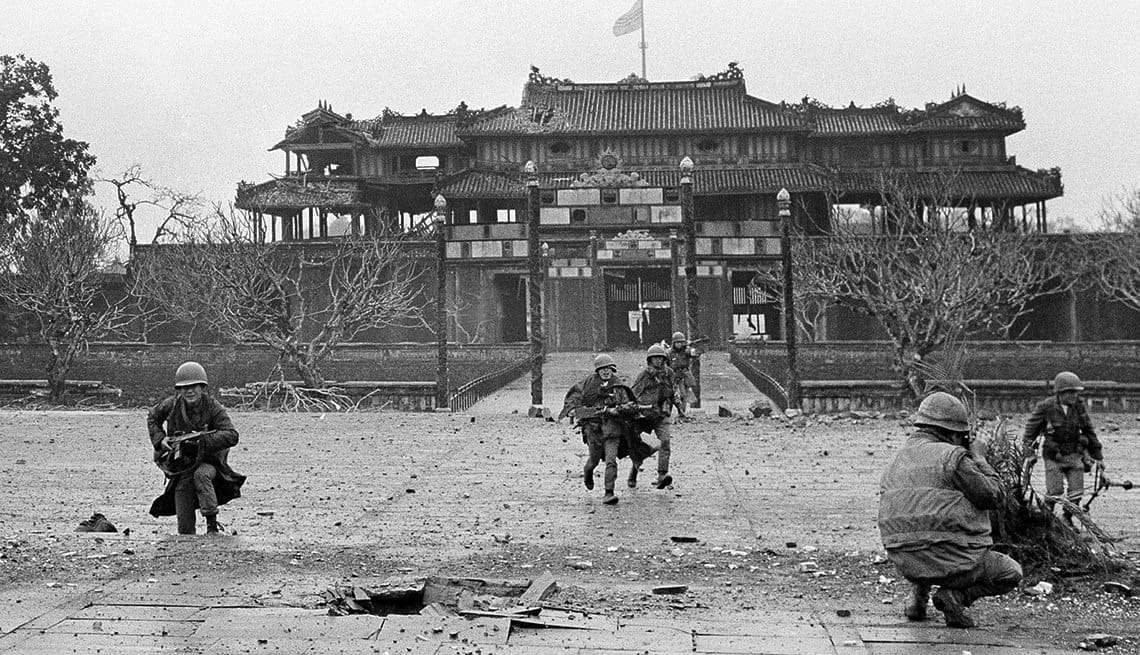
On the holiday morning of 31 January 1968, as dawn broke, almost all could see it in Hue’s old walled town. The National Liberation Front’s gold-starred, blue-and-red banner flew at the top of the Citadel’s ancient flag tower. Just a few hours before bed on the eve of Tet, the elegant former capital city citizens were packed with anticipations for the forthcoming festivities and celebrations. But now, as they were in battle, a shield of terror and foreboding descended on them. The Communists now appeared to be in charge of Hue in a flash.
This moment was inevitably made possible by months of careful preparation and training. The Communists chose the time for the attack attentively. With Tet, the enemy knew that troops in the city were reduced in strength, with northeastern monsoon usually bad weather impeding all ally re-supply operations and impeding close air support.
Around 0330, the assault forces signed an attack by launching a simultaneous missile and mortar barrage from the mountains to the West of the city. This lasted until daybreak, and by then, they had gained reasonable control of the city. As PAVN and VC troops roamed to consolidate their victories, political officials were unlucky to compile the “special lists” for South Vietnamese and foreigners. The cadres marched along the Citadel’s narrow streets, called out the names on loudspeakers, and told the cadet to report to a local school. Those that do not submit will be hunted down. It is not until the end of the war that what became of the rounded-up would become readily apparent.
The activity in Hue on the morning of 31 January was just one aspect of an astonishing, orchestrated assault. About three-quarters of southern Vietnam’s capital and most of its key cities were affected by about 80,000 North Vietnamese and VC simultaneously. They were almost completely surprised in most objective locations, as they did in Hue, where a long, bloody battle was being waged.
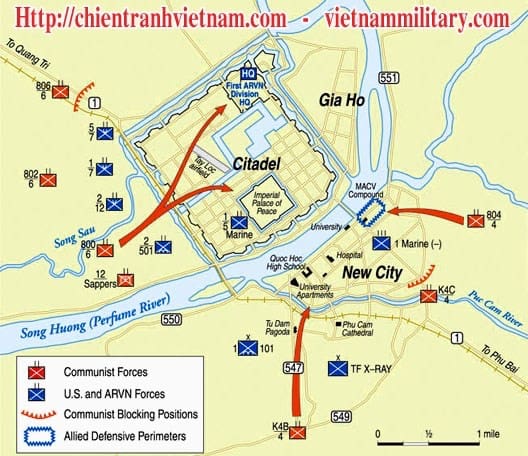
Hue’s 140,000 inhabitants in 1968 made it the third-largest town in South Vietnam and one of the most celebrated areas in Vietnam. In reality, Hue is two cities separated by the Song Huong River, two-thirds of the city population living in the old town’s walls called the Citadel, to the north of the River of Perfume. The 3-square-mile Citadel, once the residence of the Annamese emperors who controlled the center of Vietnam, was enclosed by walls up to 30 feet and up to 40 feet in thickness, each about one mile and a half in length on its side. There is a zigzag seam across three walls not bordering the Perfume River, 90 meters wide at several points and 12 meters deep.
The Citadel had homes, apartment blocks, villas, restaurants, and parks. Another fortified experience, the Imperial Palace, is located in the old walled city, where emperors kept court until the French took over Vietnam in 1883. The square with 20-foot high 2,300-foot-long walls is situated at the south end of the Citadel. The Citadel was once was dream destination, but it would prove to be “a marine rifleman’s nightmare” in February 1968.
The current portion of the city of Hue, which had around half of the Citadel site and existed in around 1/3 of the city’s population in 1968, is located to the south of the Perfume River and connected to the Citadel by the Nguyen Hoang Bridge. The jail, the regional prison, the Catholic Cathedral were there.
A reinforced army of the Republic (RVN) 1st Infantry Division head office in the Citadel’s northwest corner has been the only military presence in the region. In the city, the only fighting force was the recognition company, the Hac Bao elite, called the Black Panthers, which was established outside of the city. The national police were mainly responsible for the preservation of protection within Hue.
Around one- and one-half blocks to the south of the Ngary Hoang Bridge in the eastern edge of the modern sector was the U.S. military’s only presence in Hue on 31 January. The compound had approximately 200 U.S. Army, Marine Corps, and officers and men of Australia who acted as advisors of the 1st Division of ARVN.
The closest U.S. combat base was at Phu Bai, about eight miles south on Highway 1. Phu Bai was a major Marine Corps command post and support facility, home to Task Force X-Ray, a forward headquarters of the 1st Marine Division. Commanded by Brig. Gen. Foster LaHue, assistant commander of the 1st Marine Division, the task force consisted of two Marine regimental headquarters and three battalions—the 5th Regiment, with two battalions: and the 1st Regiment, with one battalion. LaHue and most of the troops had only recently arrived in Phu Bai from Da Nang and were still getting acquainted with their area of operations when the Battle of Hue City began. There were U.S. Army units in the area as well. Two brigades of the 1st Air Cavalry Division (Airmobile), including the 7th and 12th Cavalry Regiments. The 1st Brigade of the 101st Airborne Division, recently attached to the 1st Cavalry Division, had recently arrived at Camp Evans, north on Highway 1 between Hue and Quang Tri.
There were eight thousand communist forces in the area of Hue, with ten total battalions, including two three PAVN regiments and one battalion each. The North Vietnamese regular units were highly trained. The PAVN units were joined by six major battalions of the Viet Cong, including the 12th and the Hue City Sapper units.
While the PAVN and VC troops were very skilled in the jungle and rice paddies, they required more urban areas training. As the soldiers preparing for the war ahead, a list of “cruel tyrants and reactionary elements” prepared by VC intelligence officials was ready for Hue’s battle during the early hours of the attack. Most officers, military officers, and politicians from South Vietnam and American civilians, and other foreigners were on this list. They were taken to the jungle outside the town after being “arrested,” and they were held responsible for their “crimes” against the Vietnamese people.
The PAVN 6th Regiment launched the main southeast assault, connecting it to the VC infiltrate and racing across the Perfume River into the Citadel to the ARVN 1st Division’s headquarters, with two infantry battalions and the 12th VC Sapper Battalion. Much of the Citadel was taking, but General Ngo Quang Truong, the first commander of ARVN Division, and his squad held attackers at the compound at bay, hoping not to be overrun by the 800th and 802nd Battalions of the 6th Regiment.
Meanwhile, the ARVN held its position on the east end of the airfield until it was ordered to retire to the Division’s headquarters to facilitate its reinforcement. While in the hours of pre-dawn, the PAVN 802 battalion has repeatedly probed the ARVN defenses, its soldiers were thrown back, leaving the I Division compound in the hands of the southern Vietnamese. But at daylight, much of the Citadel and the Imperial Palace was occupied by the PAVN 6th Regiment.
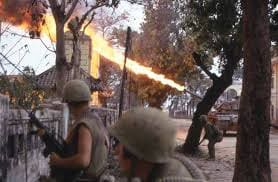
The condition was not much better for Americans south of the Parfum River. Twice, the PAVN 804th Battalion attacked the MACV complex. Each time, security forces armed with individual guns were quickly mobilized. The North Vietnamese soldiers subsequently stormed the compound walls, where a group of Marines in a bunker held them away for a short time until they were removed with several B-40 rockets. This action slowed down the PAVN attack and allowed the Americans and Australians time for defense organization. The communists attempted to cut down with mortars and automatic guns from the adjacence building after they did not take the compound in an intense firefight. The defenders went to the ground and called for reinforcements.
Two Viet Cong fighters took over the Thua Thien headquarters, the police station, and other state buildings south of the river as the fighting went raging around the MACV complex. The PAVN 810th Battalion also blocked the south edge of the city to avoid this route’s strengthening. The PAVN 810, The 4th Regiment of North Vietnam, occupied the entire city south of the Perfume River in the morning except for the MACV complex. The Communists thus took over almost all of Hue in very short order.
With only a tiny hold of his Citadel headquarters, General Truong ordered his 3rd Regiment to battle their way into Citadel northwest from their positions, supported by two airborne battalions and an armorial cavalry troop. These forces met with heavy opposition, but Truong’s headquarters reached late afternoon.
As Truong strengthened his forces, the surrounding Americans and Australians in the MACV complex issued yet another call for reinforcement. Responded, but not completely aware of the enemy situation in Hue, Brig. General Foster C. Marine Amphibious Force order. LaHue Frosty, Commander of the X-ray Task Force, has sent Company A, 1st battalion, and 1st Marine (1/1) to Phu Bai on Route 1 to alleviate the 200 MACV advisor surroundings.
Once the Marines entered the area, just a few kilometers away from the consulting team. More Phu Bai Marines joined the original forces to fight for the compound with ten people who were killed in the fight. After their relation, the Marines were ordered to cross the river and break into the Citadel of ARVN 1st DivisionDivision’s headquarters. A hail of enemy fire met the Marines as they went across Nguyen Hoang Bridge, subjecting them to heavy casualties.
Marines south of the river met Lt. Gen. Hoang Xuan Lam, commander of the ARVN I Corps, and Lt. Gen. Robert Cushman, commander of the III Marine Expeditionary Force, to come up with a plan to retake Hue. They chose to clear communist fighters from the Citadel and the rest of Hue north of the river by ARVN troops, while X-Ray task force would control the southern part of the city.
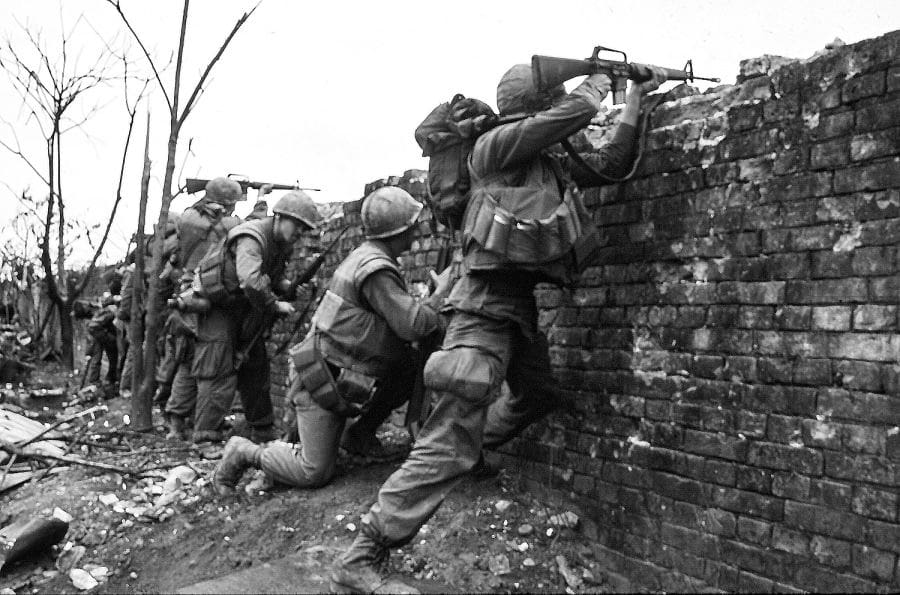
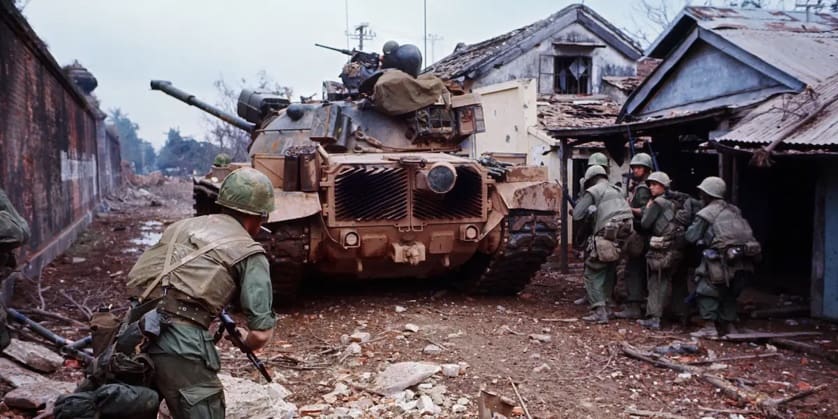
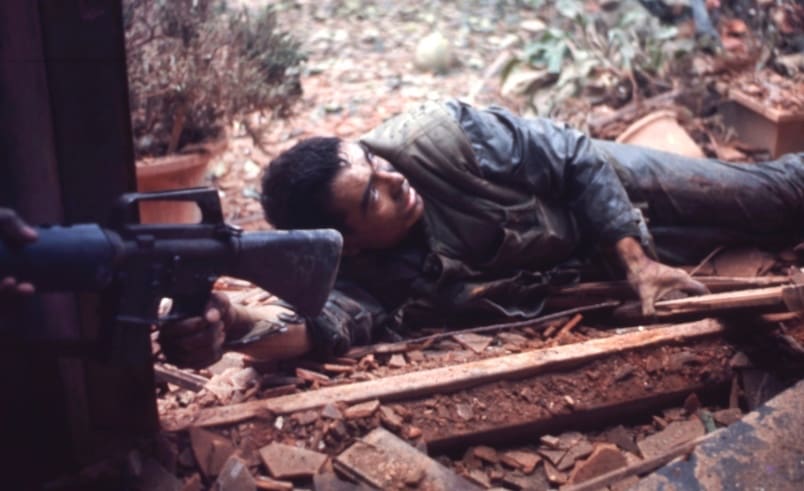
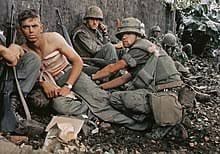
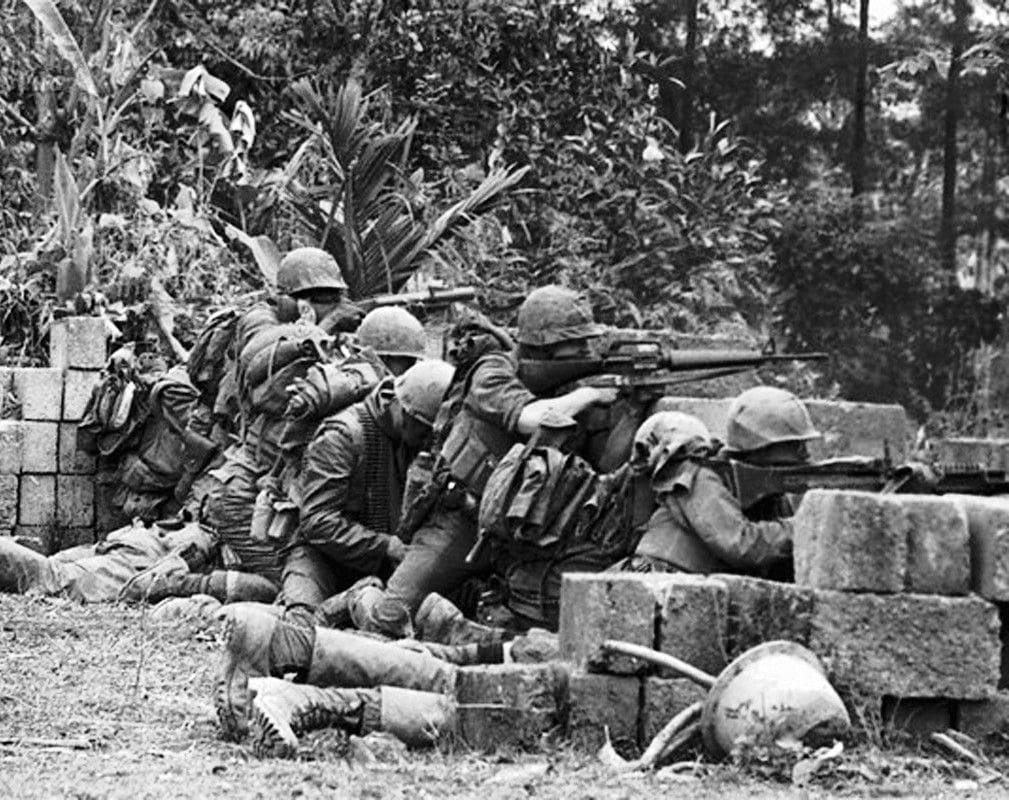
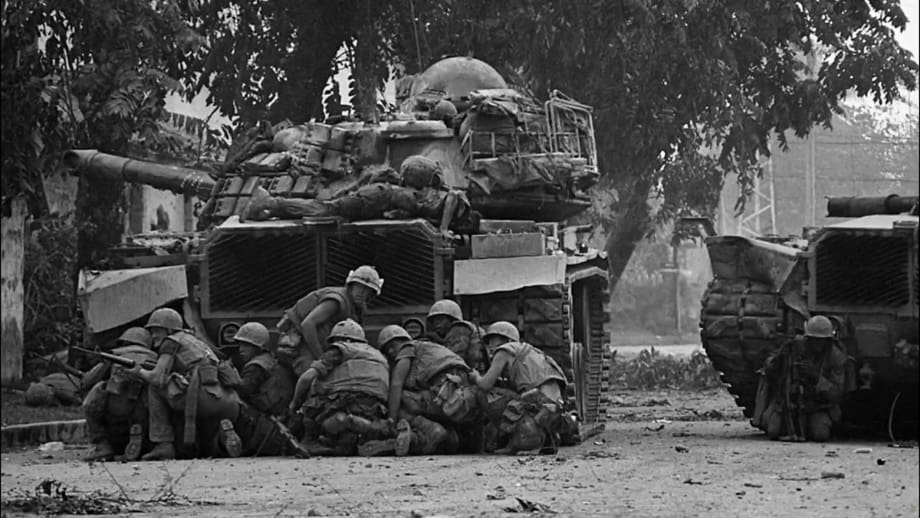
Colonel Stanley S. Hughes, First Marine Regiment Commandant, was sent by General La Hue to take overall charge of U.S. forces, now completely understanding what his marines were up to. A bitter, room-to-room building war to throw out the Marinas waged communist forces. The Marines were expected to learn on-site strategies and methods untrained in urban warfare, and their progress was expensive and methodical. The soil was gained in centimeters, and the blood was paid for each alley, street corner, window, and garden. Serious injuries have taken place on both sides.
The Thua Thien Province Headquarters, which acted as a post to monitor the PAVN 4th Regiment, was captured by H Company 2-5 of Marines on 5 February, which caused the North Vietnamese’ credibility defenses to collapse. The next week lasted hard fighting, but much of the city to the south of the river had been in U.S. hands by 14 February. Rockets and mortar rounds began to fall, and snipers threatened naval patrols, taking another 12 days to avoid. For the Marines, 38 dead and 320 injured, the new town’s fighting had been expensive. The communists were paying a higher price, and the bodies of over 1,000 soldiers from the VC and NVA were scattered over the city to the south of the river.
In the meantime, the northern battle of the river was still raging. While ARVN forces had been mobilized, the progress on the northwest and southwestern Citadel walls had effectively been blocked by 4 February, between the houses, the alleys, and the narrow streets. The Communists, who had burst deep within walls and tightly packed homes, still had the Imperial Palace and the majority of the area around and seemed to be improved as the reinforcements made their way into the city.
His troops halted, General Truong was disappointed and humiliated and compelled to seek III MAF assistance. General Cushman ordered General LaHue on 10 February to transfer a battalion to the Citadel. On 12 February 1/5 Marines reached the Citadel through a gap in the northwest wall on landing ships through the river. Around the same time, the Citadel’s south-west corner was pushed by two battalions. This accumulation of allies put intense pressure on the communist powers, but they stood up.
The Marines attacked the southern wall and suffered major losses, as the struggles were much more challenging than in the southern part of the city. The Marines were supported by aerial attacks, naval guns, and artillery support, but the enemy fiercely fought back. Back and forth was the battle before, after losing 47 people killed and 240 wounded on 17 February, the 1/2 Marines accomplished their objective.
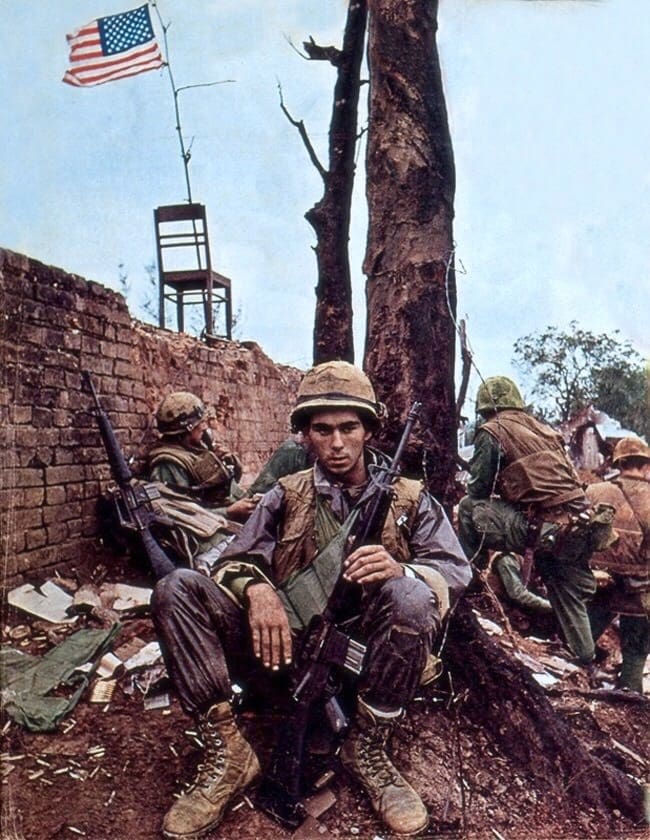
The battle lasted for days, but ARVN soldiers eventually shot down a banner from Viet Cong, 25 days, at dawn of 24 February, hung the South Vietnamese flag on the Citadel flag tower. The communist forces suffered heavy losses in this battle, losing 5,133 men at Hue; about 3,000 more were estimated to be killed outside of the city. American losses were about 142.
The epic battle over Hue left much of the historical town a devastated pile, leaving some 116,000 people homeless, as 40% of its buildings were demolished. 5,800 people have been listed as killed or missing in the population. Many of the bodies disappeared for a long time, months after the battle, mass graves were found with about 1,200 civilian bodies in 18 hastily hidden mass graves. A second large group of graves was discovered within the first seven months of 1969. Then, in September, three communist defectors said that, at the Da Mai Creek, about 10 kilometers south of Hue in February 1968, 101 AIDS agents witnessed the killing of a few hundred civilians. The majority of about 300 people in the bed of the creek were found on a quest. In all, about 2,800 bodies from these mass graves have been retrieved.
In the beginning, in the American media, the mass graves were not widely talked about. The media did not accept the early findings since they came from outlets that they viewed as discredited. Instead, most journalists appeared to focus on the bloody battle and downfall of the region. However, when the graves were identified, inquiries were started to discover the truth of the murders.
Pham Van Tuong was hiding with his family when the VC came to make the list of “reactionaries” in Viet Cong for serving as a part-time janitor in the Government Information Office. The Viet Cong gunned down all of them instantly when he came out with his three-year-old daughter, five-year-old son, and two nephews and left them on the street as a reminder for the rest of the family.
The Viet Cong traveled to Phu Cam Cathedral on the fifth day of the occupation, where about 400 men and boys had gathered. Some were on the list as the enemy; some were military age, and some looked wealthy. This party was found later on in the bed of Da Mai Creek.
An account from a group of Mennonite aid workers trapped at their homes in the communist occupation is documented by Omar Eby’s book A House in Hue, published in 1968. The Mennonites said they saw some Americans, one a farmer from the United States. They had been seen with the VC leading them away with their arms bound behind their backs. They, too, were found to be executed later.
Over the ensuing four weeks, Hue’s fighting was house by house, street by street, block by block slow with the Marines battling and tactically adapting to their enemy’s new tactics. Gradually, untimely, the Marines won back the Triangle and the Citadel, first and foremost. The devastation and bloodletting were of the essence, as well as the killing of souls. The massacre of innocents was deep, with countless civilians embedded within the fighting forces.
The political system, rooted in the NVA, forces people to recognize, chase and exterminate lists of individuals unfolded. Political cleansing started deliberately immediately after the start of the Hue attack.
This battle is one of the most important for the Marine Corps history and has been taught to every new Marine. The Marines are trained from the beginning of training “Hue City: house by house, street by street,” shouting it until their voice is grieved. Lessons learned in Hue city are still used to this day and were used in the battle of Fallujah. This battle also demonstrated every Marine’s ability to improvise and overcome as they could adapt from jungle to urban territory. Hue City is an excellent example of how fast Marines can “adapt and survive.”
There were 5 Medals of Honors awarded for actions during the Battle of Hue.
Gunnery Sergeant John L. Canley received his award over 50 years after carrying wounded Marines to safety.
Chief Warrant Officer Frederick Ferguson flew his helicopter through a barrage of anti-aircraft fire to rescue wounded comrades.
Sergeant Joe Hooper is described as the most decorated soldier of the Vietnam War
Sergeant Alfredo Gonzalez repeatedly exposed himself to direct enemy fire, leading his men despite his personal wounds.
Staff Sergeant Clifford Sims flung himself on top of an explosive device to save his platoon.
taskandpurpose.com/news/battle-hue-city-medal-honor
mca-marines.org/commanders-forums/bsp-asia/hue-city
digitalcommons.lsu.edu