Joint Base San Antonio-Lackland, Texas. —
Those who go to war together must live and train together, according to the philosophy behind the Air Force’s Special Warfare Training Wing here, which prepares operational Airmen in seven career specialties.
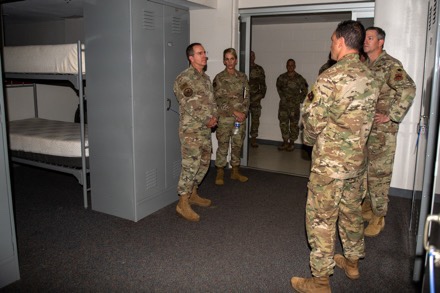
Modified facilities were built at the SWTW to ensure appropriate levels of privacy for mixed-sex cohorts of trainees at the Special Warfare Candidate Course, the course of initial entry for those who want to become Air Force Special Warfare Airmen.
These mixed-sex facilities include open-bay dormitories where male and female trainees bunk together, equipped with specially designed mixed-sex locker areas to incorporate individual shower rooms and restrooms with privacy for each trainee.
“Fostering an environment of inclusion is an imperative for the SWTW,” said Col. Nathan Colunga, SWTW commander. “The mixed-sex facilities built at our candidate course, where we first welcome Special Warfare Airmen, are only the beginning for the SWTW. The larger strategy is to build mixed-sex facilities throughout the entirety of the SWTW footprint, across the nation where every trainee, regardless of gender, is afforded the same level of privacy.”
In 2015, the U.S. Air Force began the process of integrating women into the AFSPECWAR career fields previously closed to them. The construction of the mixed sex facilities marks a positive step in the wing’s progress.
For Air Education and Training Command and 2nd Air Force, the process of broadening the pool of recruits for instructors and trainees in the Air Force’s technical-training pipelines is a top priority.
“We continuously struggle to recruit enough people who have the potential to meet our standards in Air Force Special Warfare,” said Maj. Gen. Michele Edmondson, 2nd Air Force commander, who oversees basic military training and the majority of non-flying technical training for AETC.
“I want to leave no stone unturned,” she said. “We need to be more deliberate about bringing in anyone who has the propensity to serve in these career fields and meets the standards it takes to graduate.”
The SWTW has graduated five female AFSPECWAR Airmen to date and continues to see the benefits of the mixed-sex integration efforts. There are currently two female trainees in the SWTW pipelines and continued efforts to fully integrate facilities for all sexes will ensure further diversity, inclusion and integration.
One of those graduates is Capt. Lauren Laffosse, a tactical air control party officer who is currently the chief of force integration at 2nd Air Force.
“My focus is not just on women in the special warfare pipelines,” said Laffosse. “I look at all under-represented groups and my job is to help remove barriers and ensure equitable processes across all career fields trained in 2nd Air Force.”
Laffosse participates first-hand in training courses to discover ways to make instructor and training opportunities available to a wider range of potential recruits.
“I go into training environments alongside students to observe and experience things personally,” she said. “My experience as a TACP enables me to understand the operational and training requirements so that we’re not changing the standards.”

One example Laffosse cited was a lack of female restrooms or changing areas in facilities where AFSPECWAR candidates train, something the SWTW is working to rectify.
“We need to negate the unintentional barriers that prevent people from being on the team,” said Edmondson. “I believe it is a national imperative that we look at the future fight and ensure we have the right operators available to be able to assemble the proper team required to meet an evolving mission set that looks different in the future than it has in the past.
“If we don’t appeal to all demographics to join these career-fields, we are missing a huge portion of the available talent our nation has to offer,” she said. “We need to entice anyone who can meet the community’s standards.”
For the SWTW, the future of training will be completely mixed-sex integrated.
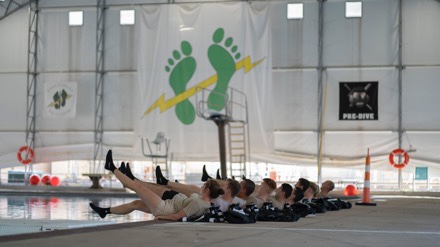
The SWTW aquatics training center set for completion in August 2023 will be fully equipped for mixed-sex training. When complete, the $66.6M aquatics training center will accommodate training for more than 3,000 AFSPECWAR trainees annually by incorporating a full range of special operations training scenarios.
The 76,000 square-foot center will feature mixed-sex restrooms, locker rooms, and showers, as well as two enclosed climate-controlled indoor pools of varying depths geared to meet the training needs for the Air Force’s global combat operations.
“The foundation we set today at the SWTW will produce the operators of the future who will compete, deter, and win the future high-end fight against peer and near-peer adversaries,” said Colunga. “We must ensure that these operators, who begin their careers in our pipelines, are able to reach their full potential and are not limited by the barriers of the past to then form the lethal and inclusive APFSPECWAR teams we need.”
Members of SWTW provide initial training for all U.S. Air Force Special Warfare training specialties, to include combat controllers, pararescue, special reconnaissance and tactical air control party Airmen.
To learn more about AFSPECWAR Airmen or other U.S. Air Force Special Warfare career opportunities, go to: www.airforce.com/careers/in-demand-careers/special-warfare.
By 1st Lieutenant Xiaofan Liu
Special Warfare Training Wing